The 3CX CRM Integration module provides out of the box integration with Salesforce. This integration allows showing a screen pop-up with the contact information on inbound calls, and launching outbound calls to your Salesforce contacts directly from the Salesforce web interface.

System Requirements
- 3CX Phone System v12 PRO edition
- 3CXPhone installed and running
- Salesforce Enterprise account or Salesforce Unlimited account (Salesforce Web Services API is used)
Installing the Salesforce.com Integration
Download set-up from here:
http://downloads.3cx.com/downloads/3CXCRM12.exe
Configuring the Salesforce Plugin
You can enable Salesforce integration by checking the “Enable Salesforce Plugin” option. If you also want to automatically register call information in the Contact’s activity history, you must check the “Store Call Information in Salesforce” option.
You must fill the Login Information section with your Salesforce user account information. If you don't have a Security Token, login to Salesforce using the web interface and go to Setup -> My Personal Information -> Reset My Security Token.
You can change the maximum digit length to compare in the Contact Lookup section. When an inbound call arrives into your extension, the caller ID may have different formats depending on your PSTN or VoIP Provider. It could have an international format (including the country code), national format (including the region or city code), or local format (including only the local number).
Also, you may have created your Contact’s phones in Salesforce with prefixes that are not present in the caller ID, such as mobile phone prefixes. In order to match the caller ID with the contact’s phone, you need to specify this parameter. The system will compare the last number of digits of the caller ID with the last number of digits of your contact’s phone, where the digit number is the specified maximum digit length to compare. Usually this parameter should be the length of your local number. With a higher number you get a greater accuracy, but you may possibly not match the caller ID with the same contact. With a lower number you get less accuracy (with possible false positives), minimizing the possibility of a no match. Finally, you can choose to look for contact information in the Contacts and / or Leads tables.
Configuring Outbound Calls Via Salesforce
The Salesforce plugin automatically creates custom fields in your Salesforce database when a user with administration privileges is configured to use the application. Each created field allows you to easily dial a different number of a contact or lead. The list of fields automatically created follows:
- In the Contact table
- Call assistant phone via 3CX
- Call fax via 3CX
- Call home phone via 3CX
- Call mobile phone via 3CX
- Call other phone via 3CX
- Call phone via 3CX
- In the Lead table
- Call fax via 3CX
- Call mobile phone via 3CX
- Call phone via 3CX
These fields are hidden by default. In order to view them in the Contacts or Leads page, you need to logon to Salesforce and change the field accessibility. To do this:
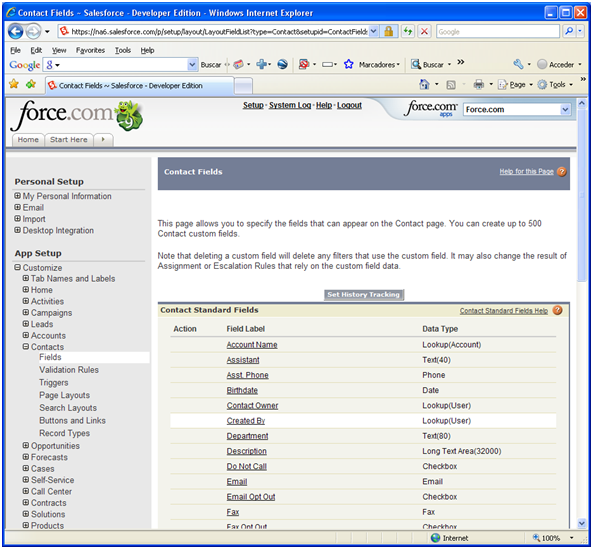
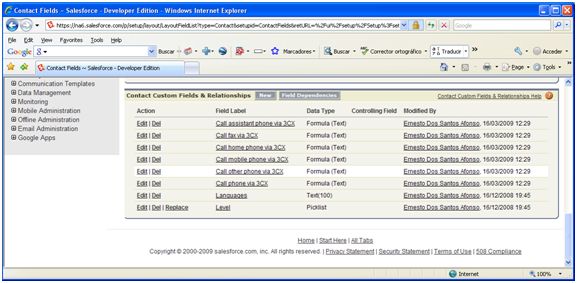
- Go to Setup -> App Setup -> Customize -> Contacts -> Fields. At the bottom of that page you will find the custom fields created.
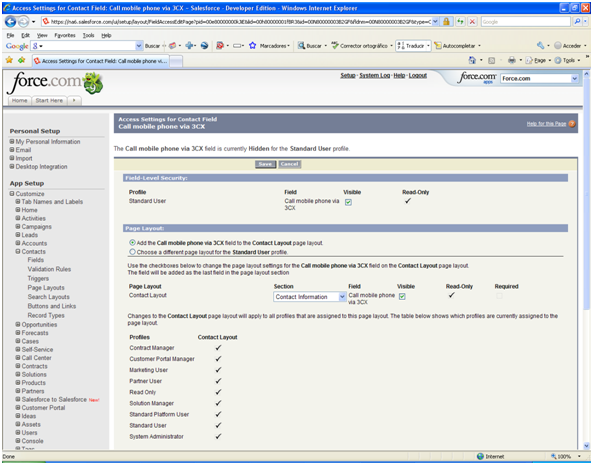
- Click on the custom field that you want to make visible, for example “Call mobile phone via 3CX”.
- Press the “View Field Accessibility” button on the upper right side of the screen.
- Click on the “Hidden” label on the right of “Standard User”.
- Check the “Visible” option in the “Contact Layout” row, and press the “Save” button to finish
- Repeat the same procedure for every field that you want to view in the Contact page.
- Repeat the same procedure for Leads, going to Setup -> App Setup -> Customize -> Leads -> Fields
Launching Calls
The Salesforce plugin allows you to automatically dial contacts simply by clicking ‘Call this contact’. The call will be triggered and set up to the user’s desktop phone WITHOUT having to actually dial the number on the phone. This saves users a great deal of time.
Once you changed the visibility attributes of the created custom fields, you are able to launch calls directly from the Salesforce web interface. The Contacts page should look like the following:
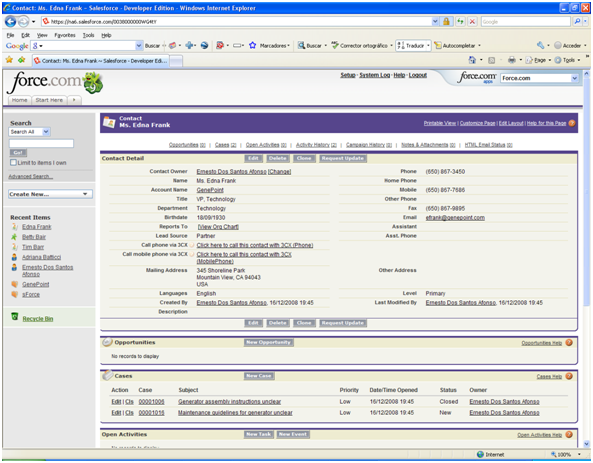
Now, for example, clicking on the link “Click here to call this contact with 3CX (Phone)” will launch a call to the contact’s phone using 3CX Phone System and connect it to your extension.


