The 3CX CRM Integration module provides out of the box integration with Microsoft Dynamics CRM. This integration allows showing a screen pop-up with the contact information on inbound calls, and launching outbound calls to your contacts directly from the Microsoft Dynamics CRM web interface.

System Requirements
- 3CX Phone System v12, 12.5 PRO edition
- 3CXPhone installed and running
- Microsoft Dynamics CRM 2011 / 2013 (4.0 support provided AS is).
Installing the Microsoft Dynamics Integration
Download set-up from here:
http://downloads.3cx.com/downloads/3CXCRM12.exe
http://downloads.3cx.com/downloads/3CXPlugins125.exe
Configuring the Microsoft Dynamics CRM Plugin
You can enable Microsoft Dynamics CRM integration by checking the “Enable Microsoft Dynamics Plugin” option. If you also want to automatically register call information in the Contact’s activity history, you must check the “Store Call Information in the Microsoft Dynamics” options section.
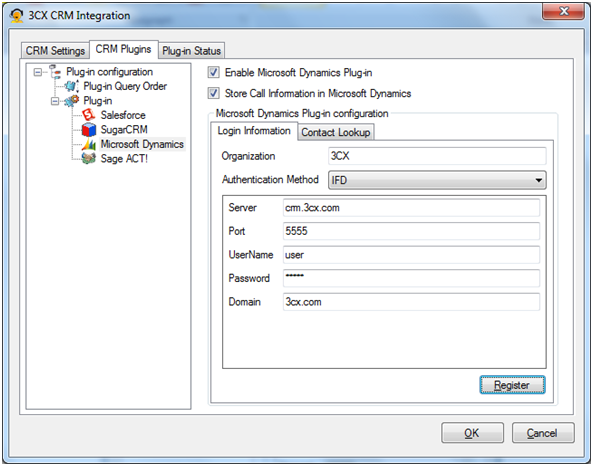
Now, you need to fill the Login Information section with your Microsoft Dynamics CRM user account information. There are 4 authentication methods available:
- On Premise: select this option when your Microsoft Dynamics CRM is configured to use integrated Active Directory authentication.
- IFD: select this option when your Microsoft Dynamics CRM is configured as an Internet‐Facing deployment.
- Windows Live: select this option if you have a Microsoft Dynamics CRM Online subscription and you login using your Windows Live account.
- Office365: select this option if you have a Microsoft Dynamics CRM Online subscription and you login using your Office 365 account.
Depending on the selected authentication method, you can configure your account with different settings. For example, when you select OnPremise authentication, you may choose to use current user credentials, or specify credentials for another user. When using Windows Live or Office365 authentication, you just need to specify your user name, password and location.
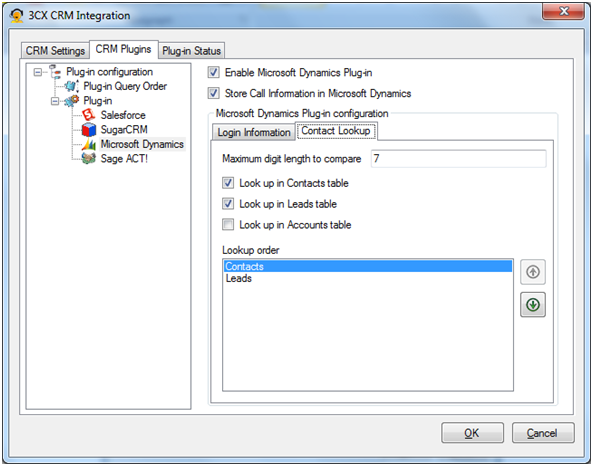
You can change the maximum digit length to compare to the Contact Lookup section. When an inbound call arrives into your extension, the caller ID may have different formats depending on your PSTN or VoIP Provider. It could have an international format (including the country code), national format (including the region or city code), or local format (including only the local number).
Also, you may have created your Contact’s phones in Microsoft Dynamics CRM with prefixes that are not present in the caller ID, such as mobile phone prefixes. In order to match the caller ID with the contact’s phone in these cases, you need to specify this parameter. The system will compare the last number digits of the caller ID with the last number digits of your contact’s phone, where any number is the specified maximum digit length to compare. Usually this parameter should be the length of your local number. With a higher number you get more accuracy, but you may possibly not match the caller ID with some contact. With a lower number you get less accuracy (with possible false positives), minimizing the possibility of a no match.
Finally, you can choose to look for contact information in the Contacts, Leads and / or Accounts tables, and select the lookup order in these tables.
Launching Calls from Microsoft Dynamics CRM
You can add customizations to your Microsoft Dynamics CRM in order to easily launch calls directly from the web interface.
IMPORTANT NOTE: if you previously added customizations for another application, this procedure will override your customizations. In order to avoid losing your current customizations, export them first and then merge them with the ones provided by 3CX in the Microsoft Dynamics Customizations.xml file.
Importing Customizations on Microsoft Dynamics CRM 2011 & 2013
In order to import the provided customizations on Microsoft Dynamics CRM 2011 & 2013:
- Login to Microsoft Dynamics CRM, and go to the “Settings” page.
- Under the “Customizations” section, select “Solutions” and press the “Import” button.
- Browse for the “TCXMicrosoftDynamicspluginsolution_1_2.zip” file located in the installation directory, for example, “C:\Program Files\3CX CRM Integration\TCXMicrosoftDynamicspluginsolution_1_2.zip”, and press the “Next” button.
- The information about the “3CX Microsoft Dynamics plugin solution” will be shown. Click “Next” to proceed.
- You will see the following message: “The import of solution: 3CX Microsoft Dynamics plugin solution completed successfully”. Press the “Publish All Customizations” button.
- Finally, press the “Close” button.
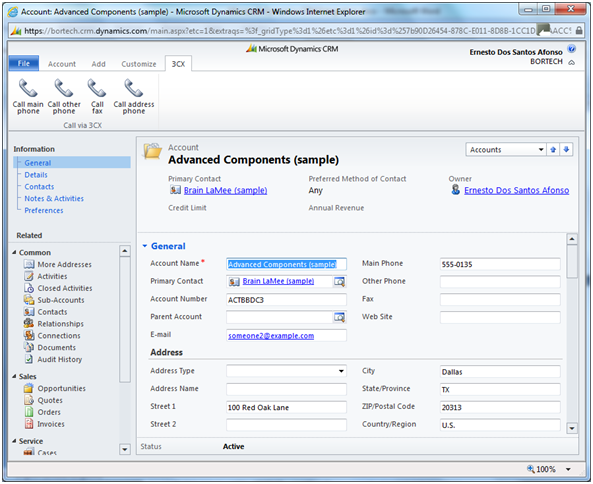
Once you have imported the customizations provided by this plugin, you will see a new tab “3CX” in Microsoft Dynamics 2011 when you open a contact, lead or account, as shown in the following screenshot.
If you’re using Microsoft Dynamics 2013, the click to call function is available in the upper menu, as shown in the following screenshot.
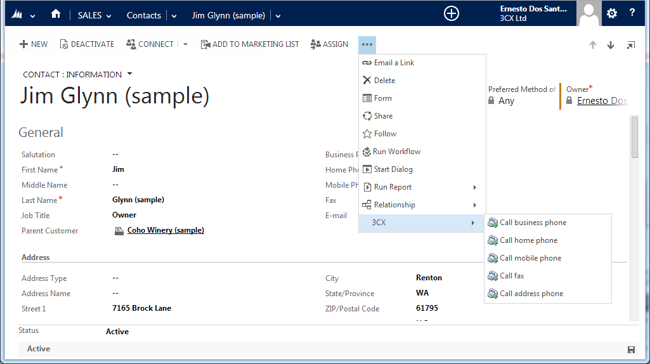
When you click “Call main phone”, the call to the contact’s main phone will be launched using 3CXPhone for Windows, which must be running. If the application is not running, you will receive a message with the error description.
Troubleshooting
Windows Live Authentication
When using Windows Live authentication, your Windows Live account must not be logged in to any other service. For example, you can’t use the same account to login to Windows Live Messenger and Microsoft Dynamics CRM Online simultaneously.
Importing Customizations on Microsoft Dynamics CRM 4.0
In order to import the provided customizations on Microsoft Dynamics CRM 4.0:
- Login to Microsoft Dynamics CRM, and go to the “Settings” page. If you have Dynamics OnLine subscription, go to step 5. Otherwise go to step 2.
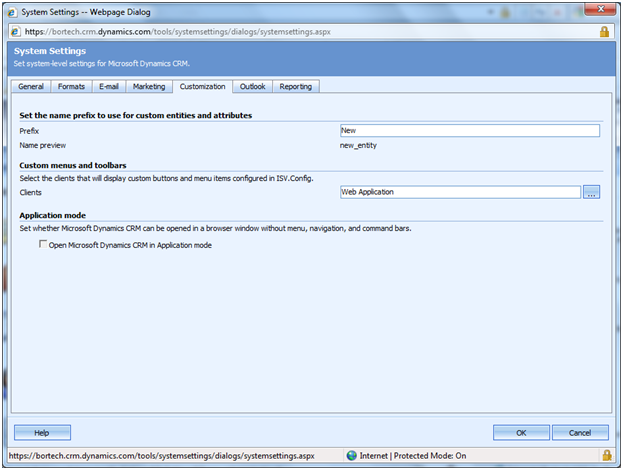
- Under the “Administration” section, select “System Settings”. The following section will be shown.
- Select the “Customization” tab and add “Web Application” to the “Custom menus and toolbars” section.
- Click the “OK” button to accept the changes and close the System Settings section.
- Under the “Settings” page select the “Customization” section, and click on the “Import Customizations” link.
- Browse for the “Microsoft Dynamics Customizations.xml” file located in the installation directory, for example, “C:\Program Files\3CX CRM Integration\Microsoft Dynamics Customizations.xml”, and press the “Upload” button.
- Select the “ISV Config” line, and then click on “Import Selected Customizations”. Press “OK” to confirm.
- You will see the “Customizations have been imported successfully” message. Press the “OK” button to finish.
Once you have imported the customizations provided by this plugin, you will see a menu when you open a contact, lead or account, as shown in the following screenshot.
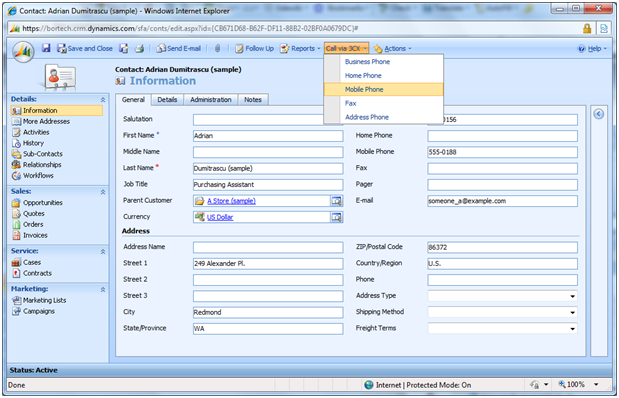
When you click “Call via 3CX” -> “Mobile Phone”, the call to the contact’s mobile phone will be launched using 3CXPhone for Windows, which must be running. If the application is not running, you will receive a message with the error description.


