
This article will provide a walkthrough on converting existing SIPTrunk.com SIPTrunks to include SMS to Chat functionality.
Phone System Version Compatibility Notice
In order to have this functionality to be setup, it is required that the phone system is set to Version 18, patch 8 for this functionality.
Why Build Out A New Trunk?
In order to enable SMS for SIPTrunk.com trunks, they must be built out as a generic SIP Trunk rather than the standard pre-defined build. The instructions below will aid in building a generic trunk for SIPTrunk.com users, but also will have tips for those who have an existing SIPTrunk so that they can swap over to the SMS enabled trunk with minimal issues.
Building out the New SIP Trunk
- Log into the bvoip phone system.
- Click on the Call Flow drop-down menu.
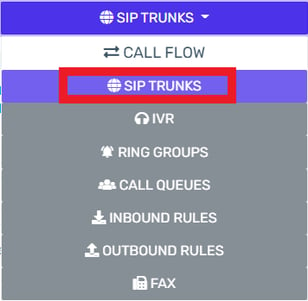
- Go to the SIP trunks menu item.
- Click on the Add SIP trunk+ button. The page will refresh with setup details.

- In the Country drop-down, select Generic.
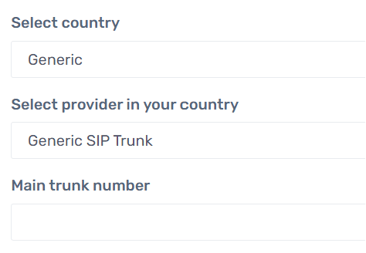
- In the Provider drop-down, select Generic Sip Trunk.
- In the Main Trunk Number field, provide a the trunk number as found in the SIP Trunk provider's portal.
- Click on the +Create button. The page will refresh to reflect more setup options on the General tab.
- Scroll down to the Trunk Details section.
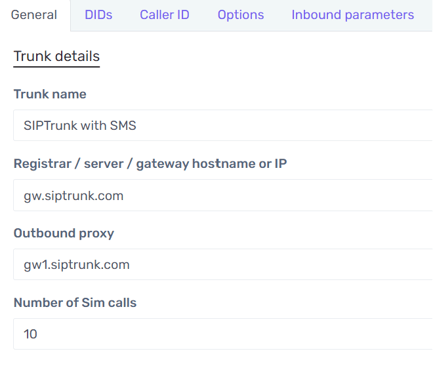
- In the Trunk Name field, input SIPTrunk with SMS for the name.
- In the Registrar/Server/Gateway field, input gw.siptrunk.com with the Auto Discovery box checked.
- In the Outbound proxy field, input gw1.siptrunk.com.
- Scroll down to Authentication section.
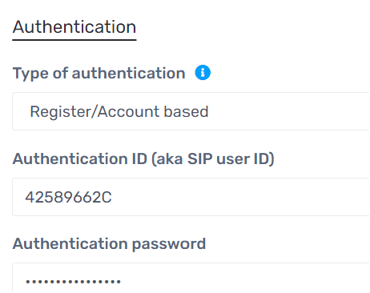
- In the Authentication ID field, copy and paste Trunk Number from SIP Provider. For those with an existing SIPTrunk, add a capital C at the end of the trunk number in this field.
- In the Authorize Password field, paste the password from SIP Provider.
- Go to the Options tab.
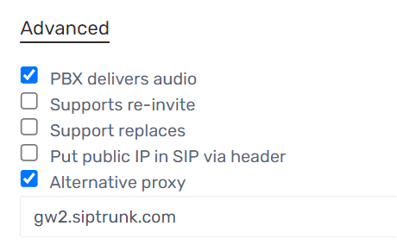
- Scroll down to the Advanced section.
- Enable the Alternative Proxy option. When enabled, a textbox will appear. Input gw2.siptrunk.com in the field. This will enable failover to our redundant gateway.
- Go to the Inbound Parameters tab.
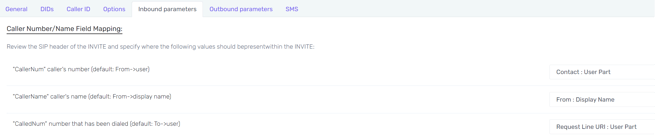
- Change the "CallerNum" caller's number (default: From->user) parameter to Contact: User Part.
- Change the "CallerName" caller's name (default: From->display name) parameter to From: Display Name
- Change the "CalledNum" number that has been dialed (default: To->user) parameter to Request-Line URI: User Part.
- Click the Save button.
Activating the SMS Functionality
- Log into the SIPTrunk.com portal.
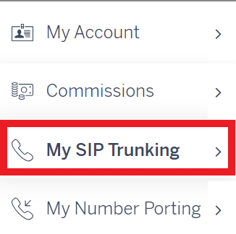
- Click on the My SIP Trunking section.

- Go to the Messaging tab.
- Click on the Webhooks button. A pop-up window will appear.

- Click on the Create new Webhook button.

- In the URL field, enter the copied Webhook URL from the bvoip phone system.

- In the Description field, enter a description.
- Click the Create button. The Webhook is now created and you can close the window
- Under the Assign WebHook column, use the drop-down to assign a DID to the Webhook.

- Click on the API Keys button. A pop-up window will appear.

- Click on the Create new API Key button.

- In the Description field, enter a description.
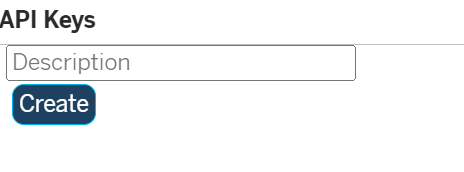
- Click the Create button. Make sure to save the Secret Key for any future use.
- In the confirmation pop-up, copy the 3CX API Token.
- Reach out to bvoip support, providing the API Key and Provider URL to be added to your trunk in the back end.
Building Out the Inbound Rules
When the SMS part of the SIPTrunk is done being enabled, the numbers will need to be re-added to the new trunk so that they work as intended and the inbound rules will need to be re-done. This is best done with the DID Helper Tool.
Changing The Number Format
Once the numbers have been added to the SMS enabled new trunk, the numbers that will be SMS enabled will need a format change from the standard setup of *1234567890. The format will need to follow the format of +1234567890 in order for SMS to chat to correctly function.
For information on where to make the change to the DIDs, please see our Adding New Phone Numbers article.
Swapping Out the Trunks
To swap out the trunks, you will need to disable the non-SMS trunk before enabling the SMS enabled trunk.
Disabling the Non-SMS Trunk
- Click on the Call Flow drop-down menu.
- Go to the SIP trunks menu item.
- Click on the Edit button beside the non-SMS SIPTrunk.
- Go to the Authentication section.
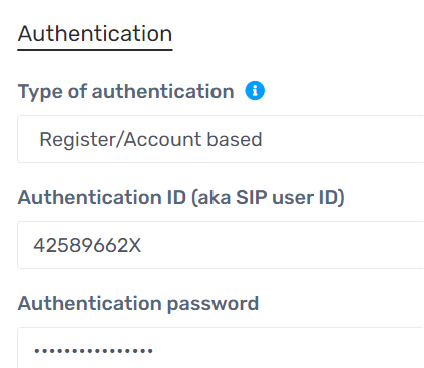
- In the Authentication ID field, add a capital X to the end of the ID.
- Click the Save button.
Activating the SMS Enabled Trunk
- Click on the Call Flow drop-down menu.
- Go to the SIP trunks menu item.
- Click on the Edit button beside the SMS enabled SIPTrunk.
- Go to the Authentication section.
- In the Authentication ID field, remove the capital C to the end of the ID.
- Click the Save button. The calls will now filter through this trunk setup and not the disabled one.
Port-Swap Clean-up Tip
You can also remove the non-SMS trunk once deactivated.
Sending and Receiving SMS Messages
Once the setup is complete, SMS will appear in the Chat section of the bvoip webclient softphone. For instructions on using this section, please see our Webclient Chat Feature article.
SMS and Images Compatibility
The chat version of SMS use supports incoming and outgoing images whereas Email to Chat does not.