
This article will provide a walkthrough on how to manually provision polycom phones.
Manual Provisioning Notice
Manually provisioning a phone should only be done if the device model is incompatible with the Managed Provisioning Portal. If there is question about whether or not the desired phone is able to be provisioned with the MPP Integration, please contact our support team.
Why Manually Provision?
Manual provisioning of the phone should not be required if you have successfully provisioned the phone using the Provisioning Polycom Phones article.
Pre-Provisioning Steps
In order to manually provision a phone that is not compatible with the MPP Integration, it must be factory reset and the phone template will need to be set in the bvoip phone system.
For steps on setting the phone template up and factory resetting, please see the following articles:
Provisioning the Phone Interface Directly
- Press the house button on the physical phone.
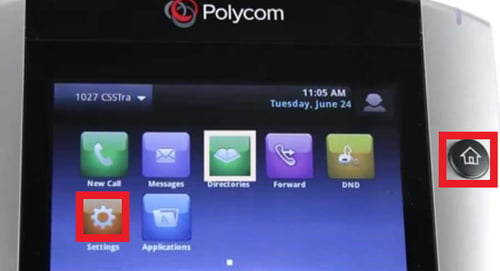
- Go to the Settings button.
- Select the Status option.
- Go to Network.
- Select the TCP/IP Parameters option. Within TCP/IP Parameters, the IP of the phone will be located to access to admin screen.
- Copy the IP and paste it into a computer browser.
Note: If the webpage can’t be reached, type https:// on the browser. The reason of this is that Polycom requires a certificate to access to the phone GUI. If that security certificate isn't available, the admin page of the IP phone will still be accessible although the web will appear as not secure.
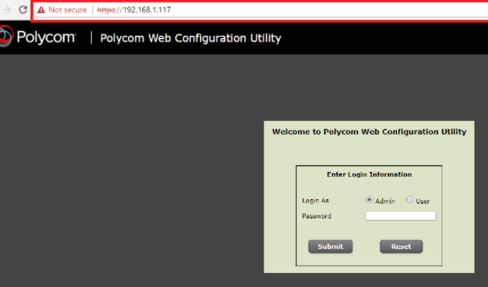
- In the Password field, type in 456.
NOTE: If the former password does not work, try with 920 or 78521. - Click the Submit button.
- Go to the Settings section.
- Expand the Provisioning Server section.
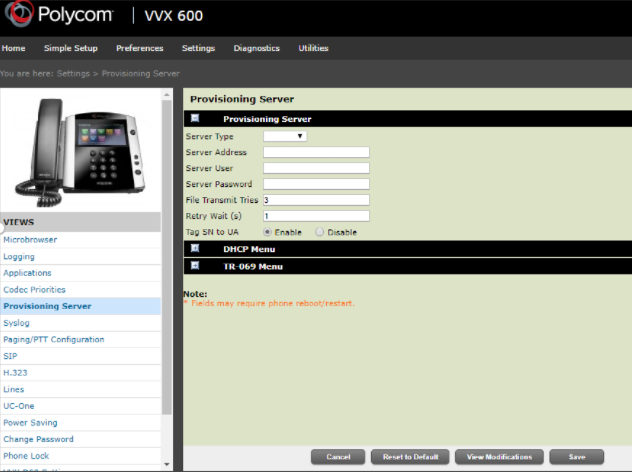
- Change Server Type to the HTTP option.
- In the Server Address field, input the provisioning URL for the desired extension with http, not https. Note: Ensure that the Server User and Server Password fields remain blank.
- Select Enable for the Tag SN to USA option.
- Click on the Save button.
- Go to the Utilities section.
- Click the Reboot Phone option.
The phone will then reboot twice, once for a firmware check and the second to complete the provisioning process. After the reboot, the phone will be setup fully so that not just calls can be setup, but also BLF keys will function as assigned in the phone system.
Phone Still Not Provisioned?
If the phone has not provisioned with either sets of instructions, please refer to our Phone Provisioning Troubleshoot Guide.