
- Old KB
- Control Portal
- Microsoft 365
-
1Stream Platform
- Admin User Functions
- Application Download
- AutoTask Integration
- BrightGauge
- Call Routing Features
- Call Tools
- ConnectWise Integration
- CrewHu
- CRM Management
- DropBox Integration
- End User Management
- Enterprise Portal
- HubSpot Integration
- Freshdesk Integration
- General Troubleshooting
- Hudu
- InfusionSoft Integration
- Insightly
- Liongard Integration
- Kaseya BMS
- MSPbots Integration
- OneDrive Integration
- Power BI
- Progressive Dialer
- Reports
- Salesforce
- ServiceNow Integration
- Signal
- SyncroMSP
- ZenDesk Integration
- Halo Integration
- Transcription and Analytics
-
Control Portal
- Auto Attendant Functionality
- BLF Keys
- bvoip Fundamentals
- Call Flow
- Call Queue
- Call Recordings
- Call Rules
- Desktop Application User Documentation
- Dial Codes
- DIDs
- Extensions
- Extension Tools
- FAQs
- Google Integration
- Microsoft 365
- Multifactor Authentication
- Phone Hours
- Settings
- Security
- Shop
- SIP Trunks
- SIPTrunk.com Partnership
- Storage
- System Notifications
- System Tools
- Troubleshooting Guides
- Users
- Webclient User Documentation
- Whitelabelling
- Zoho Integration
- WhatsApp Integration
-
Device Management & Provisioning
-
Nucleus for Microsoft Teams
-
1Stream Client
-
Messaging
Setup Custom Email for Microsoft 365
This article will walk through process for utilizing Microsoft 365 for sending messages from the phone system
Activating the Microsoft 365 Integration
If you have not already done so, you must follow the document linked below in order to first connect the phone system to Microsoft 365. This is a separate task from enabling SSO for the login portal.
Activating the Microsoft 365 Integration
Enable Custom SMTP
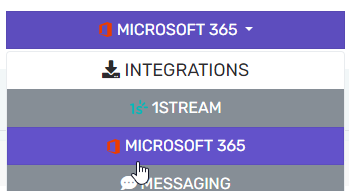
- Login to the bvoip phone system.
- In the top right go to Integrations > Microsoft 365
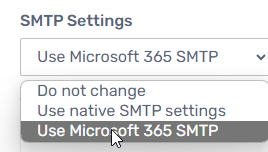
- Change the SMTP Settings to Use Microsoft 365 SMTP
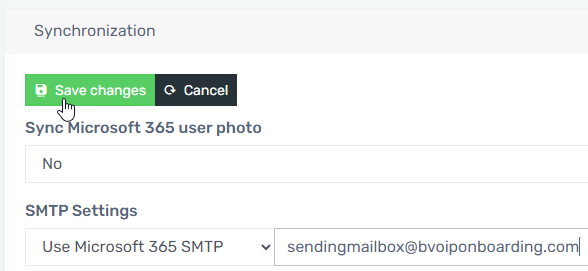
- Enter in a valid Microsoft 365 user address. This can be a shared mailbox, but the address must exist as a user principal name.
- Click Save changes
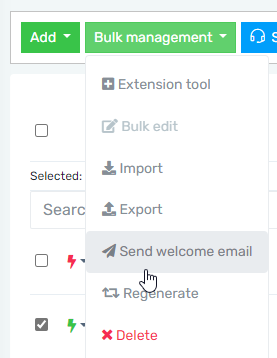
- Under the Extensions menu you can check a user and then go to Bulk management > Send welcome email to send a quick test email
- Validate that the email came in from the correct address, and you're all set!

Not receiving test emails?
Ensure that the sending address you entered is a valid user principal name in your Microsoft 365. This can be a Shared Mailbox or licensed user, but it must exist, and aliases are not allowed.
How do I update Email Templates?
If you want to adjust how the welcome email, or any other email, appears to the end user, you can check out our article Customizing the Phone System Email Templates.