
- Old KB
- Control Portal
- Call Flow
-
1Stream Platform
- Admin User Functions
- Application Download
- AutoTask Integration
- BrightGauge
- Call Routing Features
- Call Tools
- ConnectWise Integration
- CrewHu
- CRM Management
- DropBox Integration
- End User Management
- Enterprise Portal
- HubSpot Integration
- Freshdesk Integration
- General Troubleshooting
- Hudu
- InfusionSoft Integration
- Insightly
- Liongard Integration
- Kaseya BMS
- MSPbots Integration
- OneDrive Integration
- Power BI
- Progressive Dialer
- Reports
- Salesforce
- ServiceNow Integration
- Signal
- SyncroMSP
- ZenDesk Integration
- Halo Integration
- Transcription and Analytics
-
Control Portal
- Auto Attendant Functionality
- BLF Keys
- bvoip Fundamentals
- Call Flow
- Call Queue
- Call Recordings
- Call Rules
- Desktop Application User Documentation
- Dial Codes
- DIDs
- Extensions
- Extension Tools
- FAQs
- Google Integration
- Microsoft 365
- Multifactor Authentication
- Phone Hours
- Settings
- Security
- Shop
- SIP Trunks
- SIPTrunk.com Partnership
- Storage
- System Notifications
- System Tools
- Troubleshooting Guides
- Users
- Webclient User Documentation
- Whitelabelling
- Zoho Integration
- WhatsApp Integration
-
Device Management & Provisioning
-
Nucleus for Microsoft Teams
-
1Stream Client
-
Messaging
Routing Calls by Caller ID
This article will guide you through call routing based on the caller's ID entry.
From VIP clients to internal employees, there are many reasons to route frequent callers to specific destinations. Inbound rules give us the added flexibility to make our callers' lives a bit easier!
Specific and Multiple Numbers
For specific numbers, paste them exactly as it appears on your Caller ID display into the Caller ID field. Multiple numbers can be set here and separated by a comma. Ranges can also be set here with a hyphen. This field does accept wildcard characters, but be cautious as overly simple rules may cause unintended routing.
Routing Calls By Caller ID Setup
- Log into the bvoip phone system.
- Click on the Call Flow drop-down menu.
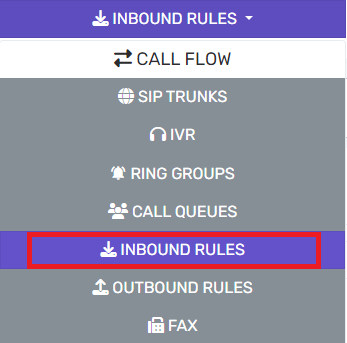
- Go to the Inbound Rules subsection.
- Click on the Add CID button.

- Scroll down to the General section.
- In the Name field, input a name for the rule.
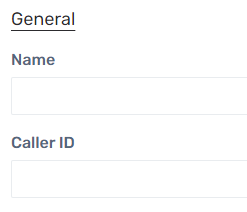
- In the Caller ID field, enter the caller ID details.
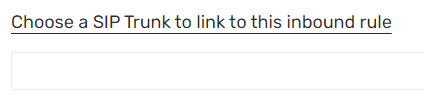
- In the Choose a SIP Trunk to link to this Inbound Rule drop-down, choose the appropriate SIP Trunk for this rule. This will likely be your main SIP Trunk.
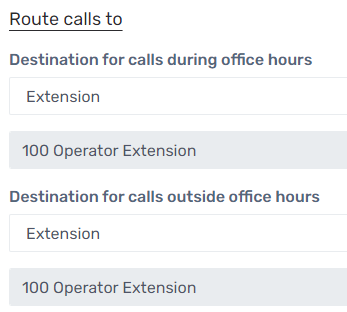
- The Route Calls To section will allow calls to be directed where that specific number should be routed for both office and after-hours. If you do not utilize office hours or do not need to route differently after-hours, simply select the same destination for both fields. For information on configuring the hours of the phone system, please see our Setting Phone Hours article.
- Click on the Save button.
More Advanced Call Routing
More advanced caller ID routing is available under the SIP Trunks subsection of the Call Flow menu. Under the Caller ID tab, the Inbound and Outbound Caller ID sections can be used in conjunction with customized patterns. We recommend that if this section is to be used to please reach out to the bvoip support team for assistance.