- Old KB
- Control Portal
- Security
-
1Stream Platform
- Admin User Functions
- Application Download
- AutoTask Integration
- BrightGauge
- Call Routing Features
- Call Tools
- ConnectWise Integration
- CrewHu
- CRM Management
- DropBox Integration
- End User Management
- Enterprise Portal
- HubSpot Integration
- Freshdesk Integration
- General Troubleshooting
- Hudu
- InfusionSoft Integration
- Insightly
- Liongard Integration
- Kaseya BMS
- MSPbots Integration
- OneDrive Integration
- Power BI
- Progressive Dialer
- Reports
- Salesforce
- ServiceNow Integration
- Signal
- SyncroMSP
- ZenDesk Integration
- Halo Integration
- Transcription and Analytics
-
Control Portal
- Auto Attendant Functionality
- BLF Keys
- bvoip Fundamentals
- Call Flow
- Call Queue
- Call Recordings
- Call Rules
- Desktop Application User Documentation
- Dial Codes
- DIDs
- Extensions
- Extension Tools
- FAQs
- Google Integration
- Microsoft 365
- Multifactor Authentication
- Phone Hours
- Settings
- Security
- Shop
- SIP Trunks
- SIPTrunk.com Partnership
- Storage
- System Notifications
- System Tools
- Troubleshooting Guides
- Users
- Webclient User Documentation
- Whitelabelling
- Zoho Integration
- WhatsApp Integration
-
Device Management & Provisioning
-
Nucleus for Microsoft Teams
-
1Stream Client
-
Messaging
Blacklisting IPs
This article will provide a walkthrough on how to use the Blacklist feature in the bvoip phone system.
How to Add an IP to the Blacklist
- Log into the bvoip phone system.
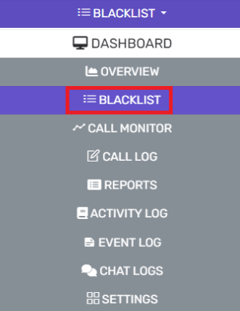
- Click on the Dashboard drop-down menu.

- Go to the Blacklist subsection.
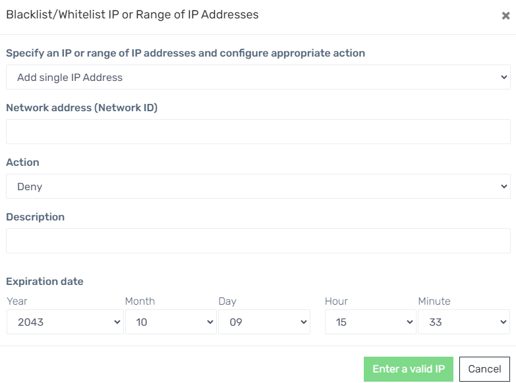
- Select the Add button. The Blacklist/Whitelist IP or Range of IP Addresses pop-up will appear.

- In the Specify an IP or range of IP addresses and configure appropriate action drop-down, select the Add Single IP Address option.

- In the Network address (Network ID) field, add the IP to be blacklisted.
- In the Action drop-down, select Deny to blacklist the IP.
- In the Description field, add descriptive context for the IP if desired.
- In the Expiration Date drop-downs, select the desired expiration date.
Note: The expiration drop-downs are in the order Year/Month/Date/Hour/Minute. - Click the Ok button.
How to Add Multiple IPs to the Blacklist
- Log into the bvoip phone system.
- Click on the Dashboard drop-down menu.

- Go to the Blacklist subsection.
- Select the Add button. The Blacklist/Whitelist IP or Range of IP Addresses pop-up will appear.

- In the Specify an IP or range of IP addresses and configure appropriate action drop-down, select the Add a Range of IP Addresses option.

- In the Network address (Network ID) field, add the IP range to be blacklisted.
- In the Action drop-down, select Deny to blacklist the IP.
- In the Description field, add descriptive context for the IP if desired.
- In the Expiration Date drop-downs, select the desired expiration date.
Note: The expiration drop-downs are in the order Year/Month/Date/Hour/Minute. - Click the Ok button.
How to Whitelist
To whitelist an IP or just remove the IP from the blacklist, please refer to our Whitelisting IPs article.
