
This article will provide a walkthrough on how to whitelist IPs that have been added to the bvoip phone system's blacklist.
How did I get Blacklisted?
IPs are blacklisted by the system either by manually being added by a user or by the system due to suspicious activity. For instances where there were multiple login attempts on a single IP, those are temporary but can be removed sooner by an Admin user.
How to Edit an IP to be Whitelisted
- Log into the bvoip phone system.
- Click on the Dashboard drop-down menu.
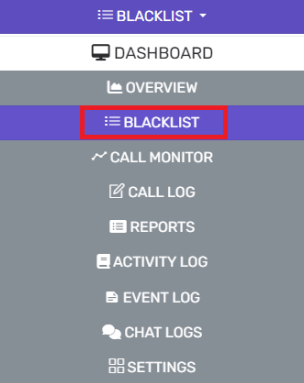
- Go to the Blacklist subsection.
- Scroll down to the desired IP in the blacklist.
- Select the Edit button. A pop-up window will appear.

- In the Action drop-down, select the Allow option.
- Click the Ok button.
How to Remove IPs from the Blacklist
To remove an IP from the blacklist, click on the X icon beside the desired IP address and in the pop-up that appears, click the Proceed button to confirm.
Adding a Whitelisted IP
- Log into the bvoip phone system.
- Click on the Dashboard drop-down menu.
- Go to the Blacklist subsection.
- Select the Add button. The Blacklist/Whitelist IP or Range of IP Addresses pop-up will appear.

- In the Specify an IP or range of IP addresses and configure appropriate action drop-down, select the Add Single IP Address option.
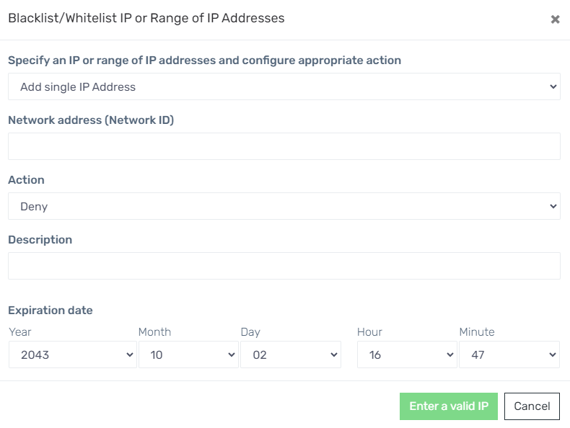
- In the Network address (Network ID) field, add the IP to be blacklisted.
- In the Action drop-down, select Allow to whitelist the IP.
- In the Description field, add descriptive context for the IP if desired.
- In the Expiration Date drop-downs, select the desired expiration date.
Note: The expiration drop-downs are in the order Year/Month/Date/Hour/Minute. - Click the Ok button.
Adding a Range of Whitelisted IPs
- Log into the bvoip phone system.
- Click on the Dashboard drop-down menu.
- Go to the Blacklist subsection.
- Select the Add button. The Blacklist/Whitelist IP or Range of IP Addresses pop-up will appear.
- In the Specify an IP or range of IP addresses and configure appropriate action drop-down, select the Add a Range of IP Addresses option.
- In the Network address (Network ID) field, add the IP range to be blacklisted.
- In the Action drop-down, select Allow to whitelist the IP.
- In the Description field, add descriptive context for the IP if desired.
- In the Expiration Date drop-downs, select the desired expiration date.
Note: The expiration drop-downs are in the order Year/Month/Date/Hour/Minute. - Click the Ok button.