
-
1Stream Platform
- Admin User Functions
- Application Download
- AutoTask Integration
- BrightGauge
- Call Routing Features
- Call Tools
- ConnectWise Integration
- CrewHu
- CRM Management
- DropBox Integration
- End User Management
- Enterprise Portal
- HubSpot Integration
- Freshdesk Integration
- General Troubleshooting
- Hudu
- InfusionSoft Integration
- Insightly
- Liongard Integration
- Kaseya BMS
- MSPbots Integration
- OneDrive Integration
- Power BI
- Progressive Dialer
- Reports
- Salesforce
- ServiceNow Integration
- Signal
- SyncroMSP
- ZenDesk Integration
- Halo Integration
- Transcription and Analytics
-
Control Portal
- Auto Attendant Functionality
- BLF Keys
- bvoip Fundamentals
- Call Flow
- Call Queue
- Call Recordings
- Call Rules
- Desktop Application User Documentation
- Dial Codes
- DIDs
- Extensions
- Extension Tools
- FAQs
- Google Integration
- Microsoft 365
- Multifactor Authentication
- Phone Hours
- Settings
- Security
- Shop
- SIP Trunks
- SIPTrunk.com Partnership
- Storage
- System Notifications
- System Tools
- Troubleshooting Guides
- Users
- Webclient User Documentation
- Whitelabelling
- Zoho Integration
- WhatsApp Integration
-
Device Management & Provisioning
-
Nucleus for Microsoft Teams
-
1Stream Client
-
Messaging
Factory Resetting Fanvil Phones
This article will provide a walkthrough on factory resetting fanvil phones.
Why Factory Reset?
For best practices with provisioning phones, we recommend factory resetting all used phones to prevent conflicting phone settings from stalling the process. When reset, the firmware will be updated and the configuration file will be accessed, pulling the provisioning details from the phone system.
Device Variance Notice
If the instructions above are too varied to do a hard reset on the desired Fanvil Device, click here.
Factory Resetting a Fanvil X-Series?
In order to do a factory reset on the Fanvil X-Series Device, click here.
How to Perform a Factory Reset
- Go to the Menu option on the physical phone screen.
- Select the Advanced option.
- Enter the Admin Password.
Note: The default password is usually 123 or admin by default. - Choose the Factory Reset option.
- All of the following items must be enabled as shown in the image below in order to get an accurate factory reset:
- Clear ETC File
- Clear Config File
- Clear Userdata
- Clear All
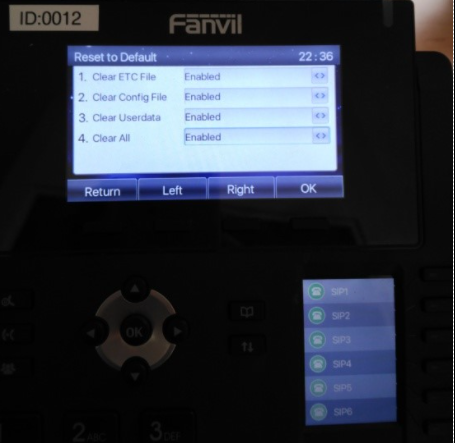
- Click the OK button.
The factory reset will then process. It will take several minutes for the factory reset process to be completed. Once the IP phone is factory reset, you must assign a template to an extension in the bvoip phone system.