- Old KB
- Control Portal
- Users
-
1Stream Platform
- Admin User Functions
- Application Download
- AutoTask Integration
- BrightGauge
- Call Routing Features
- Call Tools
- ConnectWise Integration
- CrewHu
- CRM Management
- DropBox Integration
- End User Management
- Enterprise Portal
- HubSpot Integration
- Freshdesk Integration
- General Troubleshooting
- Hudu
- InfusionSoft Integration
- Insightly
- Liongard Integration
- Kaseya BMS
- MSPbots Integration
- OneDrive Integration
- Power BI
- Progressive Dialer
- Reports
- Salesforce
- ServiceNow Integration
- Signal
- SyncroMSP
- ZenDesk Integration
- Halo Integration
- Transcription and Analytics
-
Control Portal
- Auto Attendant Functionality
- BLF Keys
- bvoip Fundamentals
- Call Flow
- Call Queue
- Call Recordings
- Call Rules
- Desktop Application User Documentation
- Dial Codes
- DIDs
- Extensions
- Extension Tools
- FAQs
- Google Integration
- Microsoft 365
- Multifactor Authentication
- Phone Hours
- Settings
- Security
- Shop
- SIP Trunks
- SIPTrunk.com Partnership
- Storage
- System Notifications
- System Tools
- Troubleshooting Guides
- Users
- Webclient User Documentation
- Whitelabelling
- Zoho Integration
- WhatsApp Integration
-
Device Management & Provisioning
-
Nucleus for Microsoft Teams
-
1Stream Client
-
Messaging
Creating New Users in Control
This article will walk you through the process of creating new users in the Control portal.
Using Microsoft 365?
You can instead setup SSO and then Import New Users from Microsoft 365 to help speed up the user creation process.
What is Control?
Control refers to the main partner portal where all users should reside, and that enables your users to utilize MFA and single sign-on between the various portals.
Password Requirements
The Control portal requires all passwords to meet the following requirements, and all users must have TOTP-based (QR code) Multi-factor Authentication.
- Minimum of 12 characters
- At least 1 of each: Uppercase, lowercase, number, and symbol
Creating Users
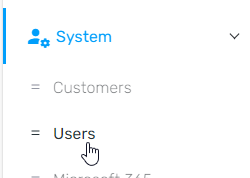
- Login to the bvoip phone system.
- Go to System > Users on the left hand side.
- In the top left click Create user

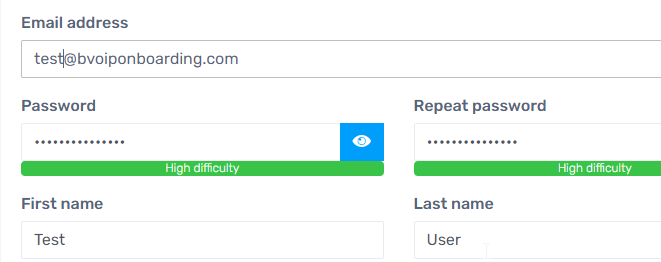
- Under the User profile tab, set the Email address, Password, First name, and Last name fields
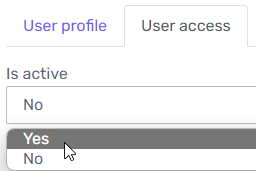
- Go to the User access tab and ensure Is active is set to Yes. You can also grant admin rights or limited access rights here if desired.
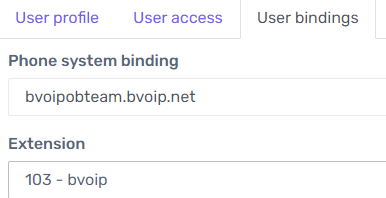
- If the user will be utilizing a phone system themselves, go to the User bindings tab and bind them to an extension in a phone system
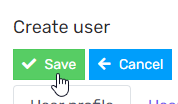
- Click Save in the top left
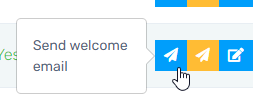
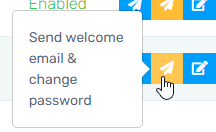
- On the far right of the user you can click the blue mail button which will send the user a welcome email without a password, or click the yellow button to Send welcome email & change password.