- Old KB
- 1Stream Platform
- Call Tools
-
1Stream Platform
- Admin User Functions
- Application Download
- AutoTask Integration
- BrightGauge
- Call Routing Features
- Call Tools
- ConnectWise Integration
- CrewHu
- CRM Management
- DropBox Integration
- End User Management
- Enterprise Portal
- HubSpot Integration
- Freshdesk Integration
- General Troubleshooting
- Hudu
- InfusionSoft Integration
- Insightly
- Liongard Integration
- Kaseya BMS
- MSPbots Integration
- OneDrive Integration
- Power BI
- Progressive Dialer
- Reports
- Salesforce
- ServiceNow Integration
- Signal
- SyncroMSP
- ZenDesk Integration
- Halo Integration
- Transcription and Analytics
-
Control Portal
- Auto Attendant Functionality
- BLF Keys
- bvoip Fundamentals
- Call Flow
- Call Queue
- Call Recordings
- Call Rules
- Desktop Application User Documentation
- Dial Codes
- DIDs
- Extensions
- Extension Tools
- FAQs
- Google Integration
- Microsoft 365
- Multifactor Authentication
- Phone Hours
- Settings
- Security
- Shop
- SIP Trunks
- SIPTrunk.com Partnership
- Storage
- System Notifications
- System Tools
- Troubleshooting Guides
- Users
- Webclient User Documentation
- Whitelabelling
- Zoho Integration
- WhatsApp Integration
-
Device Management & Provisioning
-
Nucleus for Microsoft Teams
-
1Stream Client
-
Messaging
Using the Audio Scheduler Tool
This article will provide a walkthrough on how to use the audio scheduler tool in the 1Stream Platform.
1Stream Level Feature Notice
This feature is available for only View level 1Stream users and up. If you would like this feature to be available, then please reach out to your bvoip Sales Representative to upgrade user licensing.
Using the Audio Scheduler Tool
This tool uses Ring Groups and Paging Groups to ring several users at one time to play an audio file. The call agent must have their phone status as active in order for it trigger.
Setting up the Audio Scheduler Tool
- Log into the 1Stream Portal.
- Go to the Administration menu.

- Choose the Manage Organization option. The page will refresh.
- Scroll down to the Phone System Enhancements section.

- Select the Audio Scheduler link. The Audio Scheduler Items pop-up window will appear.

- Click on the green circled + button. The Add New Audio Scheduler Item pop-up window will appear.

- In the Title field, input the desired name for this Audio Scheduler.
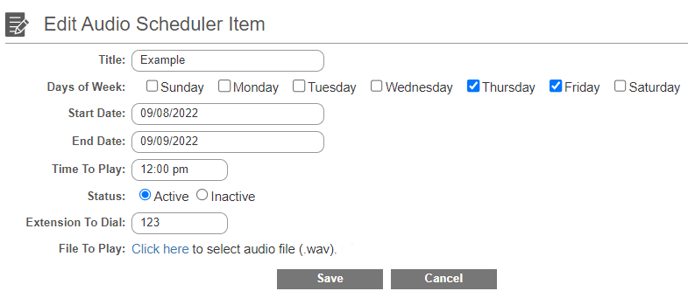
- Select the Save button. The Edit Audio Scheduler Item pop-up window will then appear.

- Check/Uncheck the boxes besides the days of the week to select what days will apply.
- In the Start Date field, input the desired start date.
- In the End Date field, input the desired end date.
- In the Time to Play field, input the desired time for the scheduler to play the audio.
- In the Extension to Dial field, input the desired extension to have the audio trigger on.
- In the File to Play section, select the Click Here text to pull an audio file from your local computer to be uploaded. There will be an OK text showing that it was uploaded when done.
- Select the Save button.
