
This article will provide a walkthrough on the setup for the Liongard API with bvoip's 1Stream integration.
1Stream Level Feature Notice
This feature is available for only View level 1Stream users and up. If you would like this feature to be available, then please reach out to your bvoip Sales Representative to upgrade user licensing.
Liongard Functionality
Liongard can Standardize, Secure, and Scall managed IT Services. Liongard supports Authentication to the API via API keys generated for a user created specific for the Integration.
More specific information can be found on Liongard's Developer Guide.
SSL Notice
An SSL is required on all calls when accessing the API. Any calls received via regular HTTP will be automatically forwarded to HTTPS.
Retrieving the API Keys
Liongard utilizes the Basic Authorization that is standard with Public and Private Keys and the Authorization header that are unique to Liongard users. This means users can use the benefits of Liongard security roles and give granular access to the APIs. Directions to setup the API keys is below.
- Login to the Liongard instance.
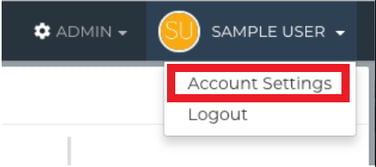
- Click on the profile drop-down in the upper-right hand corner of the navigation bar.
- Click on User Name drop-down.
- Click on Account Settings.
- Select the Access Tokens menu option.
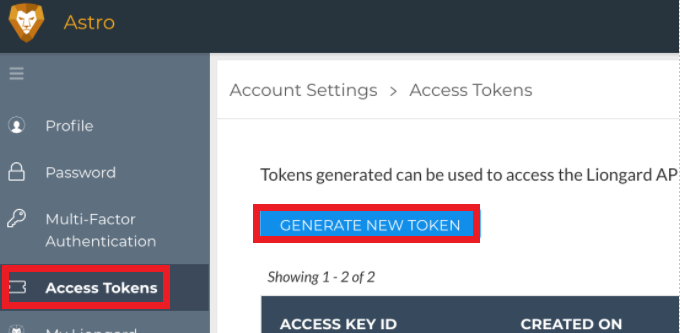
- Click on the Generate New Token button.
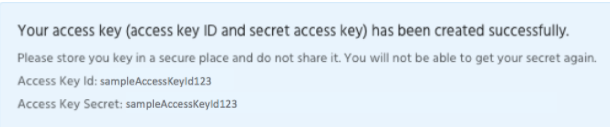
- Copy the Access Key Id and paste it into a text document.
- Copy the Access Key Secret and paste it into a text document.
Configuring LionGard with 1Stream
- Log into the 1Stream Portal.
- Go to the Administration menu.

- Choose the Manage Organization option. The page will refresh.
- Scroll down to the Connected Account and CRM Settings section.
- Click on the green circle + button. The Add New CRM Platform pop-up will appear.
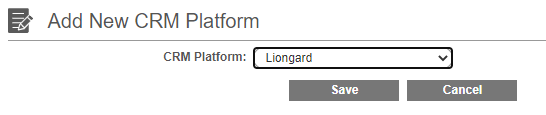
- In the CRM Platform drop-down, select Liongard.
- Click the Save button. The Edit CRM Platform pop-up will appear.
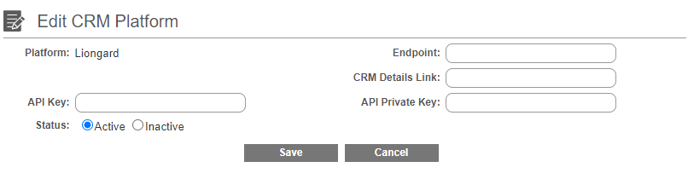
- In the API Key field, paste the Liongard Access Key ID.
- In the API Private Key field, paste the Liongard Access Key Secret.
- In the Endpoint field, input the following URL: https://xxxxxx.app.liongard.com/api/v1/
Note: Be sure to replace the x lettered placeholder with the name of your Liongard application. - In the CRM Details Link field, input the following URL: https://xxxxxx.app.liongard.com/
Note: Be sure to replace the x lettered placeholder with the name of your Liongard application. - Click the Save button.
Adding the Screen Pop
- Scroll down to the Screen Pop URL section.
- Click the green circled + button. The Add New Screen Pop URL pop-up will appear.
- In the LinkName field, add a Link Name.
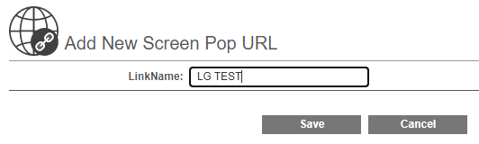
- Click the Save button. The Edit Screen Pop URL pop-up will appear.
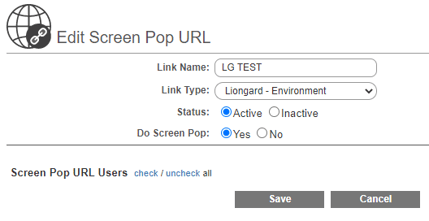
- In the Link Type drop-down, select Liongard – Environment.
- Click the Save button.