
This article is to provide a walkthrough on setting up a SIP Trunk with SIPTrunk.com in the bvoip phone system.
What is a SIP Trunk?
A SIP Trunk provider provides you a line or (trunk) with the external world. So, when a call is made from an outside line to an internal line of the PBX, the call will use the specified SIP trunk as a path. If a client or tenant has issues with outbound or inbound calls, which is common, we recommend to check the functionality of the SIP trunk.
- SIPTrunk Reseller Account Sign-up Page (Teams and User Rates)
- Teams Rate Plan Portal
- SIPTrunk Reseller Account Sign-up Page (Channel and Minutes Rates)
- Using the SIPTrunk Account as a Reseller
- Using the SIPTrunk Account as a Reseller Customer
SIP Service Notice
An active SIP trunk provider must be setup prior to beginning this process. If you need a demo SIP provider account, we are partnered with SIPTrunk.com.
Setting up a SIP Trunk with SIPTrunk.com
The instructions below will apply to most SIP trunk providers, however, this specific article will be using a common provider named SIPTrunk.com below as an example.
- Log into the bvoip phone system.
- Click on the Call Flow drop-down menu.
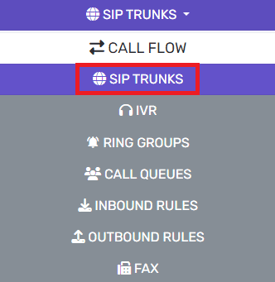
- Go to the SIP trunks menu item.
- Click on the Add SIP trunk+ button. The page will refresh with setup details.

- Select country and provider out of the dropdowns as it matches the information from your SIP provider.
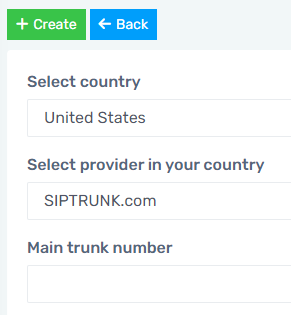
- In the Main Trunk Number field, provide a the trunk number as found in the SIP Trunk provider's portal.
- Click on the +Create button. The page will refresh to reflect more setup options.
- Scroll down to the Authentication section.
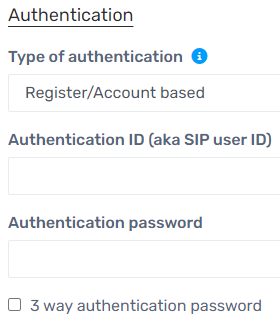
- In the Authentication ID field, copy and paste Trunk Number from SIPTrunk.com.
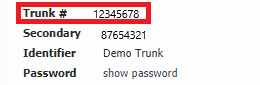
- To find the demo trunk number in your SIPTrunk.com account:
- Log into your SIPTrunk.com account.
- Go to the My SIPTrunking section.
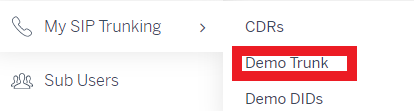
- Select the Demo trunk option.
- Scroll down to the Trunk number and copy it.
- To find the trunk number in your active SIPTrunk.com account:
- Log into your SIPTrunk.com account.
- Go to the Dashboard section.
- Select the Trunk tab.

- Scroll down to the Trunk number and copy it.
- To find the demo trunk number in your SIPTrunk.com account:
- In the Authorize Password field, paste the password from SIPTrunk.com.
- To find the password in your demo SIPTrunk account:
- Log into SIP Trunking account
- Go to the My SIPTrunking section.
- Select the Demo trunk option.
- Scroll down to the Password.
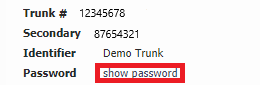
- Click on the Show Password text.
- Copy the Password.
- To find the password in your active SIPTrunk.com account:
- Log into your SIPTrunk.com account.
- Go to the Dashboard section.
- Select the Trunk tab.
- Scroll down to the Password.
- Click on the Show Password text.
- Copy the Password.
- To find the password in your demo SIPTrunk account:
- In the SIPTrunk.com portal, pull the DIDs to be used.
- To find the demo DIDs that were ordered in your Demo SIPTrunk.com account:
- Log into SIP Trunking account
- Go to the My SIPTrunking section.
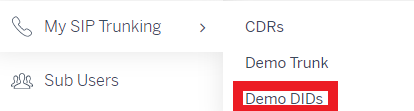
- Select the Demo DIDs option.
- The purchased DIDs will be visible. If there are not any DIDs they will need to be generated.
- Click the Click Here prompt.
- Click on the Begin Search.
- Select the state, area code and city from the designated drop-downs.
- Pick the phone numbers.
- Click the Review Order button.
- Click the Process Order button.
- Once DIDs are populated, copy the number from the SIP provider.
- To find the DIDs that were ordered in your active SIPTrunk.com account:
- Log into your SIPTrunk.com account.
- Go to the Dashboard section.
- Select the Ordered DID tab.

- The purchased DIDs will be visible. If there are not phone numbers listed, numbers will need to be ordered. To order, please follow the instructions listed in our Ordering Phone Number instructions.
- To find the demo DIDs that were ordered in your Demo SIPTrunk.com account:
- Once DIDs are populated, copy the number(s) from the SIPTrunk.com portal.
- Return to the bvoip portal.
- Click the Add Single DID button. A blank row will appear.
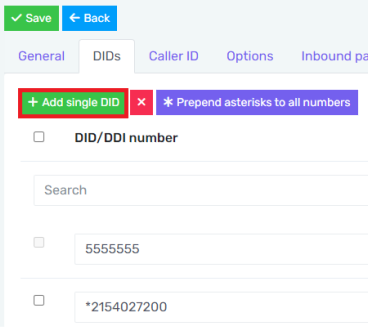
- Paste DID number from SIP provider into the blank field.
Note: Replace the 1 at the beginning of the number with an asterisk, this makes it where the number will work with or without a 1 prepend when dialed. - Repeat for each DID as needed.
- Click the Save button at the top of the screen.