
This article will provide insight on building out outbound rules specific for Teams Integration setups.
Setting up SIP Trunk Configuration
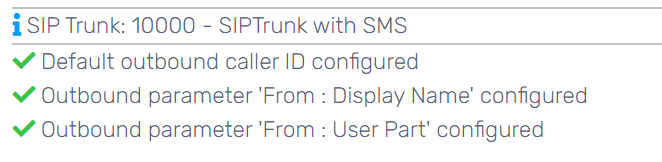
Prior to setting up the outbound rules for the teams setup, some steps are needed to validate the SIP trunk. Failure to do so, can cause the Teams integration not to work. There are three things needed to verify the SIP trunk:
Step One: Updating the Default Caller ID in the SIP Trunk
- Login to the bvoip phone system.
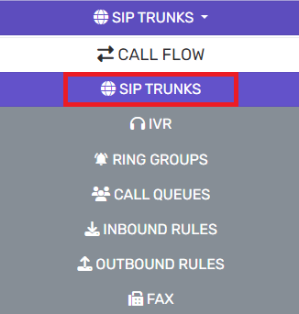
- Go to Call Flow > SIP Trunks in the top navigation bar.
- Click on the Caller ID tab.
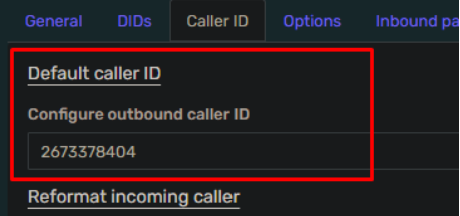
- In the Configure Outbound Caller ID field, input the desired number to appear on the caller ID for system calls and for any calls that don't have it overridden elsewhere.
- Click the Save button.
Step Two: Updating the SIP Trunk Outbound Parameters
- Login to the bvoip phone system.
- Go to Call Flow > SIP Trunks in the top navigation bar.
- Click on the Outbound Parameters tab.

- Scroll down to the From : Display Name parameter.
- Select the "EnforcedOriginatorCallerID" option from the drop-down.

- Scroll down to the From : User Part parameter.
- Select the "EnforcedOriginatorCallerID" option from the drop-down.
- Click the Save button.
Step Three: Validating the SIP Trunk
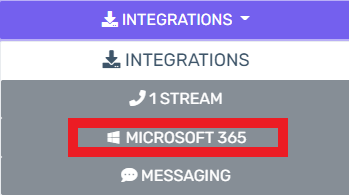
- Go to the Integrations > Microsoft 365 menu.
- Click on the SIP Trunks tab.
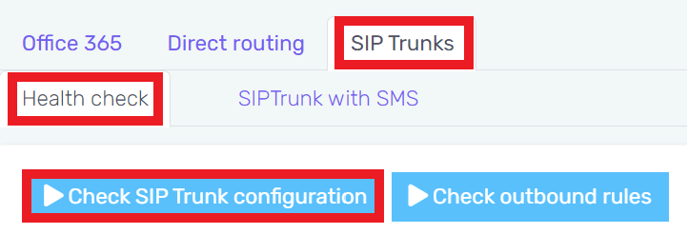
- Go to the Health Check tab.
- Click on the Check SIP Trunk Configuration button. The screen will then change and confirm that the SIPTrunk is all set or if there's a change needed for the teams setup to be ready.
Configuring Teams Outbound Rules
When configuring outbound rules for Teams, there is a few different ways that the outbound rules can be configured, depending on the desired Caller IDs. All of this is dependent on the client’s needs when it comes to the caller ID.
- Configuration Option One : Using the Same Caller ID with Pure Teams
- Configuration Option Two : Different Caller IDs or Split Use Teams
Using the Same Caller ID with Pure Teams
If you are going to use one caller ID for all users you can add the caller ID in the sip trunk itself, and then simply add a single outbound rule for Teams.
Configuring a +CC Outbound Rule For the System
- Log into the bvoip phone system.
- Click on the Call Flow drop-down menu.
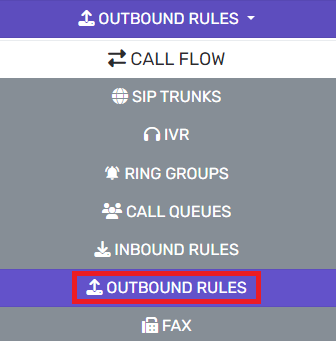
- Go to the Outbound Rules subsection.
- Select the Add button. The screen will refresh with rule setup details.

- In the Rule Name field, Enter the desired name. For simplicity, we recommend Teams 12 Digit.
- Scroll down to the Under Apply This Rule To These Calls section.
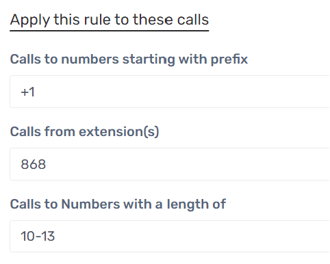
- In the Calls to numbers starting with prefix field, input the desired country code, +1 in this example for North America.
- In the Calls to Numbers with a Length of field, input the value of 10-13.
- Scroll down to the Make outbound calls on section.

- In the unlabeled or Block Calls drop-down, choose the desired Siptrunk to be used for this rule.
- In the Strip Digits drop-down, select the value of 1.
- Click the Save button.
Different Caller IDs or Split Use Teams
If you manually set all users Telephone Number field in Microsoft 365 to be a full e164 number (e.x. +1234567890), that will sync down to their Caller ID field, and you can simply use the basic 10-13 digit rule mentioned above. If you have users still using physical devices or other soft phones, you will likely also need the 10 and 11 digit rules mentioned below, but you do not need per-extension outbound rules.
Otherwise, if you're using our script to set all users telephone numbers to their extension, you will need to create 2 sets of rules then use the Automatic Outbound Rule Tool to create the +1 outbound rule for each extension.
- 11 Digits
- 10 Digits
For assistance on building these rules out, please see our Setting Outbound Call Rules knowledge base article.
Automatic Outbound Rule Creation
- Go to the Integrations > Microsoft 365 menu.
- Go to the SIP Trunks tab.
- Select the tab with the name of your SIPTrunk.

- In the Outbound Rule Prefix field, input your country code with the plus sign (+1 for North America) .
- In the Outbound Rule Length, input 10-13 for the value, this may need to be adjusted depending on the country.
- In the Outbound Rule Strip Digits field, input 1 for the value.
- Scroll down to the Caller ID Overwrite section.
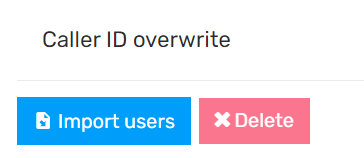
- Click on the Import Users button. A pop up will appear where the Teams users can be pulled to have custom Caller ID rules applied to them.
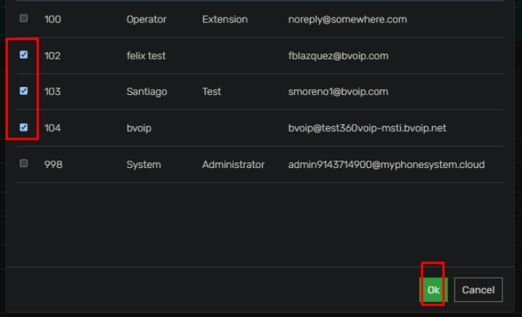
- Select the desired users by clicking on the checkboxes beside them.
- Click on the Ok button.
- In the Caller ID field for each user, input the desired Caller ID to be reflected.
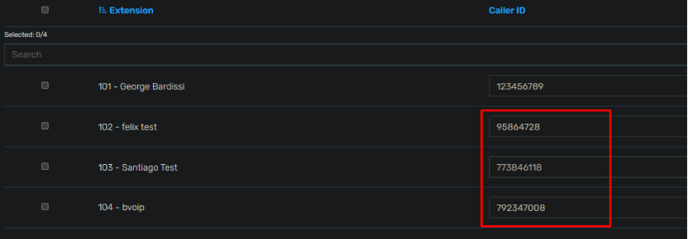
- Click on the Save button.
- Go to the Health Check tab.
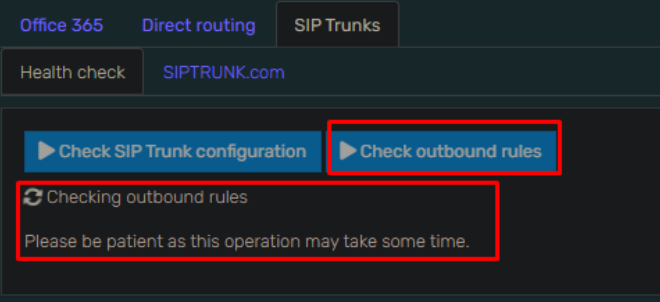
- Click on the Check Outbound Rules. The extension based outbound rules will be built out and reflected under Call Flow > Outbound Rules.
Teams Calls Not Working?
If you're having issues with Teams calls not working after setting up your Teams Integration, please see our Teams Not Making and Receiving Calls article.