This article is intended to provide a walkthrough on connecting to Salesforce through the phone system management console.
1Stream Level Feature Notice
This feature is available for only Lite level users and up. If you would like this feature to be available, then please reach out to your bvoip Sales Representative to upgrade user licensing.
Phone System Notice
The features listed below are only available for versions 16 and later of the phone system.
Process Prerequisites
- Your Salesforce account must have REST API Enabled. Check here for the Salesforce editions in which the API is available.
- Salesforce accounts with Person Accounts enabled are not supported.
- More information on this setup can be found here.
Setting up Salesforce
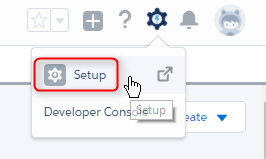
- Login to your Salesforce Account .
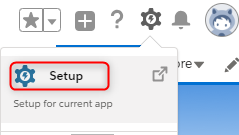
Note: If you do not have a Salesforce login, create a Developer Account. - Click on the Gear icon.
- Select the Setup option.
- Go to the section Platform tools section.
- Select Apps.
- Choose App Manager.
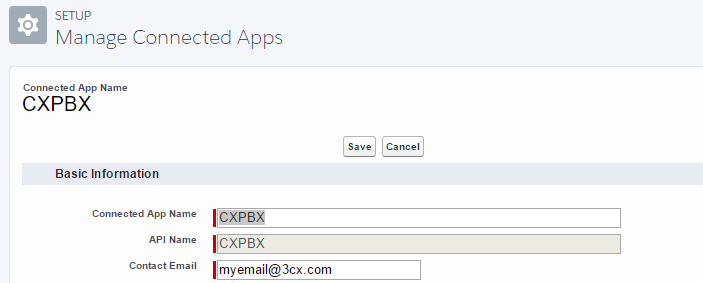
- Click the New Connected App button.
- Enter an App Name and a Contact Email.
- Click the Save button.
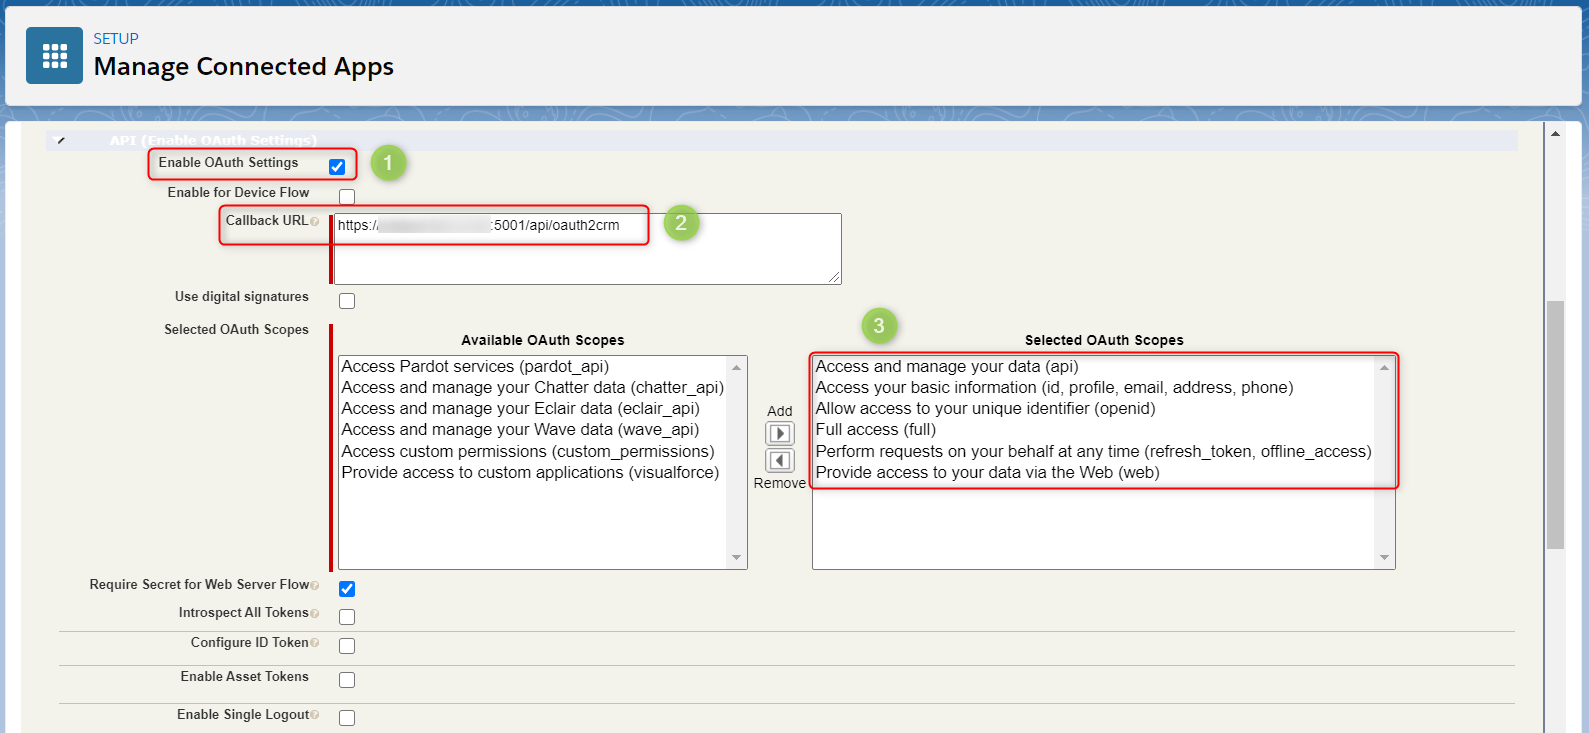
- Scroll down to the API (Enable OAuth Settings) section.
- Enable the checkbox Enable OAuth Settings box.
- For the Callback URL field, enter the URL used to access the phone system management console with the appending /api/oauth2crm to it.
- Grant the permissions below:
- Access and manage your data (API).
- Access your basic information.
- Access to your unique identifier (OpenID).
- Full Access.
- Perform requests on your behalf at any time.
- Provide access to your data via the Web.
- Click the Save button.
- Select Apps.
- Go to App manager.
- Click Find your App from the list.
- Click View.
- Scroll down to the API section.
- Copy the Consumer key.
- Copy the Consumer Secret.
- Click on Manage at the top.
- Go to Edit Policies.
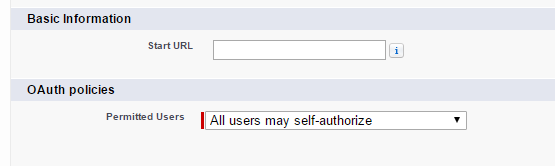
- Scroll down to the OAuth policies section.
- Set Permitted Users to All Users May Self-Authorize from the drop-down.
- Press the Save button.


Call Journaling
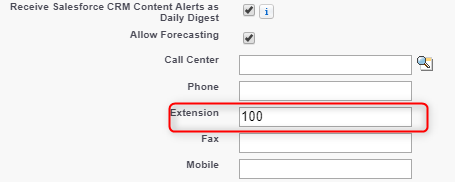
If external calls need to be reported to Salesforce, populate the Dedicated Extension field on the User Entity with the Agent Extension Number. This way the phone system can map the Extension Number of the agent that received the call to the Salesforce User.- Click on the Gear icon.
- Click on Setup.
- Click on the Administration Users section.
- Select Users.
- Open the Users for whom you need to report calls.
- Click Edit.
- Populate the Extension field with the Extension Number.
- Click the Save button.

Phone System CRM Server-side Configuration
Contact Matching Strategy
Salesforce requires that phone number lookup is performed using the last 4 or 7 digits. If the integration queries the CRM using a different number of digits, Salesforce will not return any data.- Go to Management console.
- Click Contacts.
- Select Options.
- Set the Match at Least X Number of Characters to either 4 or 7.

Contact Creation
- Login to the phone system Management Console.
- Click Settings.
- Select CRM Integration.
- Check the Enable Contact Creation checkbox. This option allows the creation of New Contacts in the CRM when a call is received from an unknown number that not found in both the phone system and the CRM.
- Configure the desired Contact Creation parameters.

General Settings
- Login to the phone system Management Console.
- Click on the Settings section.
- Select the CRM Integration subsection.
- Choose the Server Side tab.
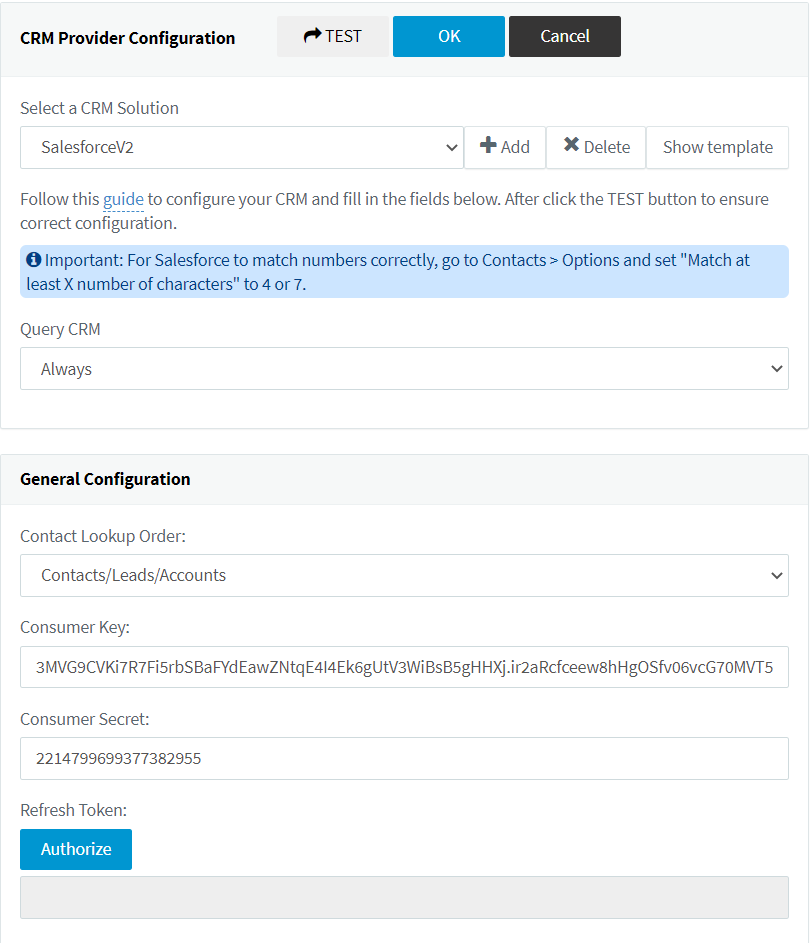
- In the Select a CRM Solution drop-down, select SalesforceV2.
- In the Consumer Key field, paste the Consumer Key.
- In the Consumer Secret field, paste the Consumer Secret.
- Click the Authorize button to start the Authorization process.
- Grant access to the phone system, and the Refresh Token will be shown under the Authorize button.
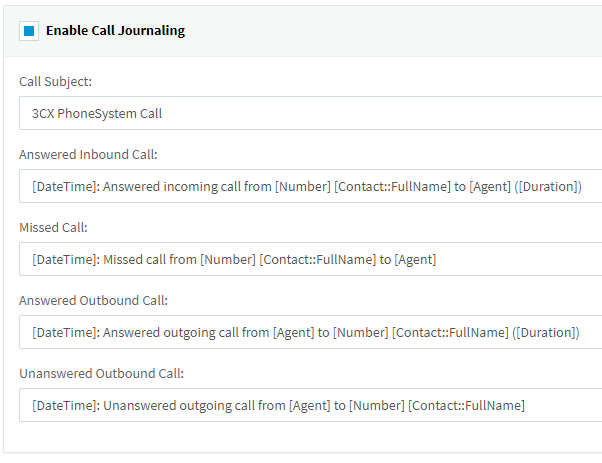
Call Journaling
- Login to the phone system Management Console.
- Go to Settings.
- Click on CRM Integration.
- Check the Enable Call Journaling checkbox to report External Calls to the CRM.
- Configure the Call Journaling parameters.
- Call Subject: The subject of the call.
- Answered Inbound Call: Description for answered Inbound Calls.
- Missed Call: Description for missed calls.
- Answered Outbound Call: Description for answered Outbound Calls.
- Unanswered Outbound Call: Description for unanswered Outbound Calls.
- Set the Call Journaling parameter variables. Variables are specified between [], for example the external number is specified as [Number].