
This article will provide a walkthrough on how to setup the priority call routing tool within 1Stream.
1Stream Level Feature Notice
This feature is available for only Engage level 1Stream users and up. If you would like this feature to be available, then please reach out to your bvoip Sales Representative to upgrade user licensing.
Feature Activation Notice
Once you have setup everything for priority call routing in 1Stream, a ticket will need to be submitted to request that the feature be activated so that the phone system part of the setup can be completed.
What is Priority Call Routing?
Priority Call Routing allows for your call flow to be customized based on a client or account within your CRM. As long as the phone number is listed in the client's account or the contact, it will route the call as you dictate.
Changing Priority Notice
When removing clients from being included in the priority call routing feature, please bear in mind that the Contact cache only updates every hour, once updated, removals will be applied.
Setting up Priority Call Routing in the Phone System
- Log into the bvoip Phone System.
- Go to the Call Flow section.
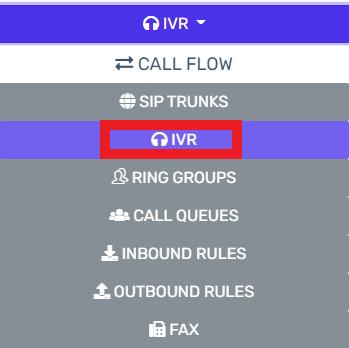
- Select the IVR subsection.
- Edit or Create the IVR that should be routing the Priority calls.
- Scroll down to the Destination for invalid or no DTMF input section.
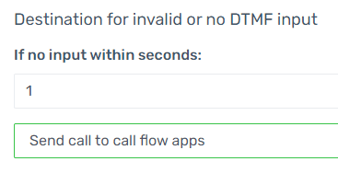
- In the If No Input Within Seconds field, add the number of second before routing the call to the Priority Calls.
- In the drop-down directly beneath, select the Send Call to Call Flow Apps option. The Destination drop-down will then appear.

- In the Destination drop-down, select the priorityrouting.Main option.

- Click the Save button.
Setup Variation Notice
The instructions below reflect setup based on having the IVR go directly to the function. However, the setup can be be applied similarly through a Key Press in the IVR.
Setting up Priority Call Routing in 1Stream
- Log into the 1Stream Portal.
- Go to the Administration menu.

- Choose the Manage Organization option. The page will refresh.
- Scroll down to the Experience Settings section.
- In the Routing No Match DN field, input the desired extension for the destination of the call if the number doesn't match a priority number.

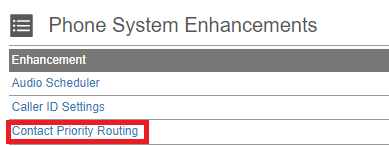
- Scroll down to the Phone System Enhancements section.

- Click on the Contact Priority Routing option. The Contact Priority Routing pop-up will appear.
- Click on the green circled plus sign. The Add Contact Priority Routing pop-up will appear.
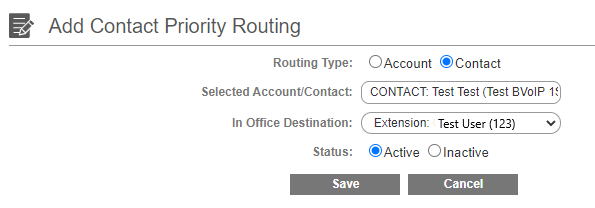
- For Routing Type, select if you want to the system to reference a Contact or Account.
- In the Selected Account/Contact textbox, type in the first name or word associated with the Contact or Account that you want to route.
- In the In Office Destination drop-down, select the desired destination for the caller to be sent to when calling.
- Click the Save button.