
This article will provide a walkthrough on how to set up the paging devices in the bvoip phone system.
What is a Paging Device?
The paging feature is used as an intercom. By dialing a number, one user can contact directly with another user on the system without calling them. We recommend using devices that enable multi-cast functionality.
Each paging device is different in regards to the functionality and limits for paging. To obtain the list of devices that permit the paging feature, please review the paging section of the bvoip Store.
Pre-Provisioning Steps
Before attempting to provision the desired phone, ensure that you have factory reset and updated firmware on the device and enabled MPP for the desired extension.
For information on enabling MPP before provisioning the desired device, please see the following article:
Provisioning the Phone Template
- Log into the bvoip phone system.
- Click on the Extensions drop-down menu.
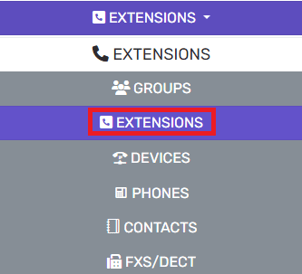
- Go to the Extensions subsection.
- Select the Edit button next to the extension that the device is being applied to. Click the Add button to create an extension that the device will be applied to.
- Navigate to the Phone Provisioning tab.

- Click on the Add New Phone Device button. A pop-up will appear.

- Select the desired device model in the Templates drop-down.
Note: Make sure to use a template ending with -bvoip after the needed phone model.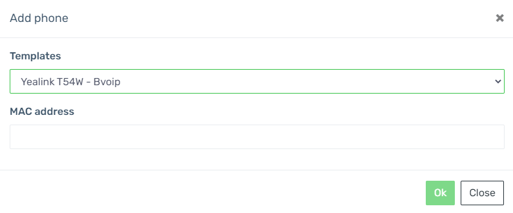
- Add the MAC address without colon into the MAC Address field.
- Select the Save button. The pop-up for the provisioning will close and the page will refresh with new sections being shown.
- Click the Save button to save the phone template to the extension.
Once the phone template has been saved, reach out to the support team for the device template to be adjusted to ensure that the device that will be paging out or receiving pages will be set in the template of the set devices.