
This article will provide a walkthrough for setting up SMS to Chat functionality for the bvoip phone system.
Pre-requisite SIP Notice
Starting from V18 Update 5, SMS configuration resides directly within the SIP Trunk configuration in order for the SMS functionality to work. Be sure when adding the number into the SIP Trunk that it is added in e164 formatting or the SMS functionality will fail. (+countrycodeDID)
For assistance in the setup of SIP Trunks in the bvoip phone system, please refer to our Setting up SIP Trunks article.
Wanting to Use Another SIP Provider?
While this article will cover the setup with FlowRoute, the following other providers are supported and can be set up as shown in this article with some differences exclusively on the provider's portal: Bandwidth, Telnyx and Twilio.
Enabling SMS Functionality
After adding the SMS provider's SIP Trunk to the phone system, you will need to enable SMS on the phone system side.
- Log into the bvoip phone system.
- Click on the Call Flow drop-down menu.
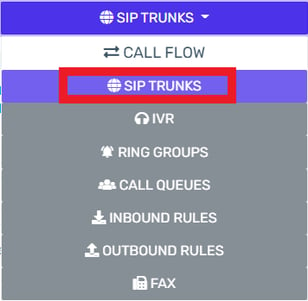
- Go to the SIP Trunks menu item.
- Scroll down to the desired SIP Trunk.
- Click on the Edit button.
/FRSMStoChat1.png?width=114&height=56&name=FRSMStoChat1.png)
- Navigate to the SMS tab.
/FRSMStoChat2.png?width=688&height=30&name=FRSMStoChat2.png)
- Copy the Webhook URL.
/FRSMStoChat3.png?width=688&height=275&name=FRSMStoChat3.png)
- Go into the Flowroute portal.
- Select DIDs from the menu. The Manage Your DIDs screen will appear.
/FRSMStoChat7.png?width=222&height=356&name=FRSMStoChat7.png)
- Click on the box for the desired SMS number.
/FRSMStoChat8.png?width=677&height=471&name=FRSMStoChat8.png)
- Go to the Choose a DID Action drop-down menu.
- Select the Enable Messaging option.
- Click on the Apply Action button. A confirmation pop-up will appear.
/FRSMStoChat9.png?width=441&height=180&name=FRSMStoChat9.png)
- Click on the Ok button to accept.
- Go to the Preferences menu.
/FRSMStoChat10.png?width=213&height=346&name=FRSMStoChat10.png)
- Navigate to the API Control section. The page will show API keys and refresh shortly afterwards to show the Messaging Webhooks page.
/FRSMStoChat11.png?width=688&height=28&name=FRSMStoChat11.png)
- In the SMS field, paste the Webhook URL from the bvoip phone system.
- In the MMS field, paste the Webhook URL from the bvoip phone system.
/FRSMStoChat12.png?width=688&height=132&name=FRSMStoChat12.png)
- Click on the the Update URL buttons for both the SMS and MMS field.
- Confirm the SMS Webhook Version is 2.1. If it is not, it will need to be updated.

- Scroll down to the API Key section.
/FRSMStoChat13.png?width=688&height=61&name=FRSMStoChat13.png)
- In the Name field, provide a common name.
- In the Description field, provide a general description, if desired.
- Click on the Add New button. A pop-up will appear with a new API Key.
- Click on the API Key top copy it over. Close the pop-up when copied.
/FRSMStoChat14.png?width=527&height=214&name=FRSMStoChat14.png)
- Copy the Access Key.
/FRSMStoChat15.png?width=664&height=140&name=FRSMStoChat15.png)
- Go back to the bvoip phone system.
- Click the Enable SMS box to activate section.
/FRSMStoChat4.png?width=688&height=275&name=FRSMStoChat4.png)
- In the Secret Key field, paste the API key from the Flowroute portal.
/FRSMStoChat6.png?width=688&height=275&name=FRSMStoChat6.png)
- In the Access Key field, paste the Access key from the Flowroute portal.
/FRSMStoChat5.png?width=688&height=275&name=FRSMStoChat5.png)
- Click the Save button.
Creating Inbound Rules
After the SMS connection has been built into the phone system, inbound rules must be created for each SMS DID, if they are not created already. The inbound rules indicates which route the SMS should follow. SMS DIDs can be assigned to an extension user or call queue.
- Log into the bvoip phone system.
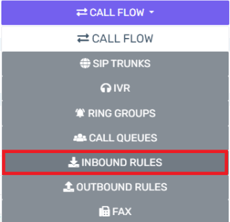
- Click on the Call Flow drop-down menu.
- Go to the Inbound Rules subsection.
- Create a new Inbound Rule by clicking the Add DID button.
- The page will refresh.

- Scroll to the Trunk Details section.
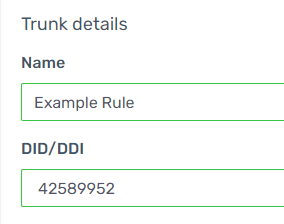
- In the Name field, list a name to differentiate it from other DIDs.
- In the DID/DDI field, select the desired DID from the drop-down.
- Go to the Route Calls To section.
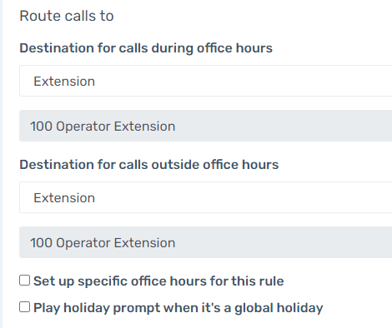
- Select the Destination For Calls During Office Hours by clicking on the two drop-downs beneath it.
- This should be either a direct extension user or call queue for the purpose of SMS.
- Select the Destination For Calls Outside Office Hours by clicking on the two drop-downs beneath it.
- This should be either a direct extension user or call queue for the purpose of SMS.
- Click the Save button.
Routing to a Call Queue
If a Call Queue is selected in the Route Calls To option, this can allow members of that call queue to receive all new incoming SMS messages. Whoever then replies first to the SMS message is now the owner of the Chat.
Enabling SMS on Extensions
After the inbound rules have been created and routed to the correct extension or call queue, SMS must be enabled on each individual extensions. If you have not created the extension, please be sure to refer to our Creating Phone Extensions article.
- Log into the bvoip phone system.
- Click on the Extensions drop-down menu.
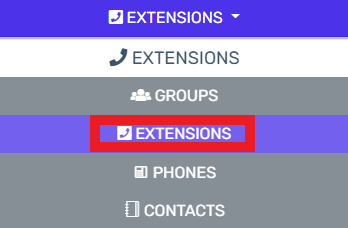
- Go to the Extensions subsection.
- Scroll down to the desired extension.
- Click on the Edit button.
- Select the General tab if not already selected.
- Scroll down to the Enable SMS section.
- Click the Enable SMS box to activate section.
/FRSMStoChat16.png?width=643&height=134&name=FRSMStoChat16.png)
- In the Can Send SMS via drop-down, select the Flowroute (Inbound Message Routes to Extension/Call Queue) option.
- Click the Save button.
Sending and Receiving SMS Messages
Once the setup is complete, SMS will appear in the Chat section of the bvoip webclient softphone. For instructions on using this section, please see our Webclient Chat Feature article.
SMS and Images Compatibility
The chat version of SMS use supports incoming and outgoing images whereas Email to Chat does not.