
This article will provide a walkthrough on how to create a dialing list with a CSV import in 1Stream for the progressive dialer feature.
1Stream Level Feature Notice
This feature is available for only Power level 1Stream users and up. If you would like this feature to be available, then please reach out to your bvoip Sales Representative to upgrade user licensing.
The Progressive Dialer feature allows for call agents to be able to jump into different calling lists that are pre-setup from different API integrations.
Creating the Dialing List
- Log into the 1Stream portal.
- Go to Administration.
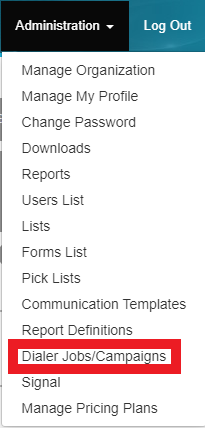
- Click on Dialer Jobs/Campaigns from the drop-down.

- Click the Add New link. The Add New Dialer Job pop-up will appear.
- In the Title field, name the dialer job.
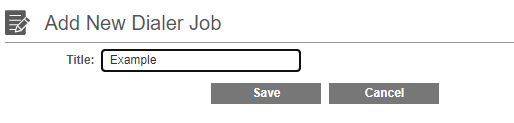
- Click the Save button. The page will refresh to display the Manage Dialer Job Number page.

- In the Wrap Time (Sec) field, set the seconds that a call agent will have to wrap-up their notes after each call.
- In the Outbound Caller ID field, set the callback ID intended for the dialer job.
- In the Script Notes textbox, insert a call script to be used by call agents for the calls associated with this dialer job.
- In the Status drop-down, select the Dialing option to activate the call list once saved.
- Scroll down to the Contacts section.
- Click the import icon to import a CSV file. A pop-up will appear to select a file from the local computer.

- Once a file has been selected, the data will be parsed and a few fields will need to be selected.
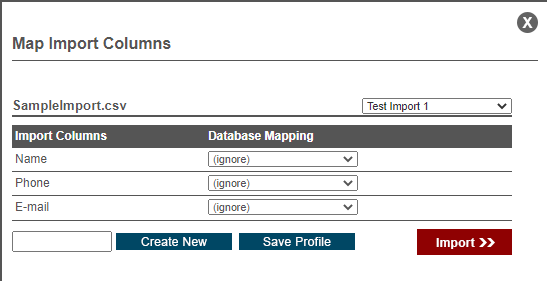
- In the top drop-down, select a previous import profile, if desired. This is for the ability to reload a mapping if using the same file format frequently.
- In the Database Mapping column, select the table in the each drop-down that should apply to the items in the Import Column.
- Click on the Import button. Once done, the system will give you a confirmation message and you will be able to see the accounts imported, total accounts to dial and accounts remaining numbers update.

Want to Create a New Import Profile?
- Click on the bottom field next to the Create New button.
- Add the desired Profile Name in the text field.
- Make sure that the drop-downs in the Database Mapping column are filled out. At minimum, one mapping should be filled out.
- Click the Create New Button.
To save to an existing profile, select the existing profile from the drop-down, update the mapping and click on the Save Profile button.