- Old KB
- 1Stream Platform
- Reports
-
1Stream Platform
- Admin User Functions
- Application Download
- AutoTask Integration
- BrightGauge
- Call Routing Features
- Call Tools
- ConnectWise Integration
- CrewHu
- CRM Management
- DropBox Integration
- End User Management
- Enterprise Portal
- HubSpot Integration
- Freshdesk Integration
- General Troubleshooting
- Hudu
- InfusionSoft Integration
- Insightly
- Liongard Integration
- Kaseya BMS
- MSPbots Integration
- OneDrive Integration
- Power BI
- Progressive Dialer
- Reports
- Salesforce
- ServiceNow Integration
- Signal
- SyncroMSP
- ZenDesk Integration
- Halo Integration
- Transcription and Analytics
-
Control Portal
- Auto Attendant Functionality
- BLF Keys
- bvoip Fundamentals
- Call Flow
- Call Queue
- Call Recordings
- Call Rules
- Desktop Application User Documentation
- Dial Codes
- DIDs
- Extensions
- Extension Tools
- FAQs
- Google Integration
- Microsoft 365
- Multifactor Authentication
- Phone Hours
- Settings
- Security
- Shop
- SIP Trunks
- SIPTrunk.com Partnership
- Storage
- System Notifications
- System Tools
- Troubleshooting Guides
- Users
- Webclient User Documentation
- Whitelabelling
- Zoho Integration
- WhatsApp Integration
-
Device Management & Provisioning
-
Nucleus for Microsoft Teams
-
1Stream Client
-
Messaging
Client Contact Groups
This article will provide a walkthrough on the process of setting up and utilizing Client Contact Groups for the Inbound Contact Group Summary Report in 1Stream.
1Stream Level Feature Notice
This feature is available for only Core level 1Stream users and up. If you would like this feature to be available, then please reach out to your bvoip Sales Representative to upgrade user licensing.
Feature Use Case
Client Contact Groups are intended to be a distinct grouping that you can utilize with the Inbound Contact Group Summary report, allowing to repeatedly pull call details with ease for specific companies, contacts, or groups of either.
Creating Client Contact Groups
- Log into the 1Stream Portal.
- Go to the Administration menu.

- Choose the Manage Organization option. The page will refresh.
- Scroll down to the Client Contact Groups section.
- Click the green + button. Add New Contact Group pop up will appear.

- In the Group Name field, enter a name.
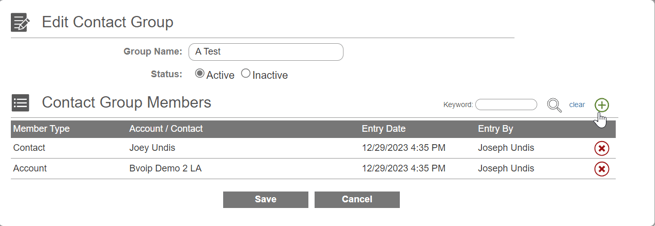
- Click the Save button. The Edit Contact Group pop up will appear.
- Click the green + button to the right of Contact Group Members to add the desired contacts and accounts.
- Click the Save button.

Utilizing the Report
- Log into the 1Stream portal.

- Click on the Reports icon. The screen will refresh with a listing of all the available reports.
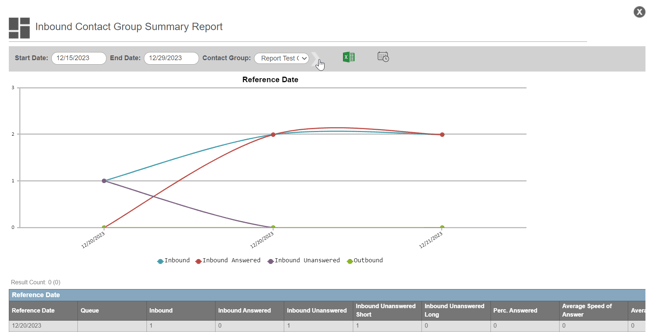
- Select the Inbound Contact Group Summary Report. A pop up window will appear.

- Select the desired dates.
- Select the desired Contact Group.
- Click the right arrow to run the report.

- You can choose to export the report with the Excel icon, or schedule the report to be sent via email each day using the calendar icon.
