
This article will provide a walkthrough on the provisioning CISCO SPA phones.
Incompatibility Notice
CISCO phones are not compatible with our Managed Provisioning Portal. This phone type will need to be manually provisioned.
Pre-Provisioning Steps
Before attempting to provision the desired phone, ensure that you have factory reset the device.
For information on completing these tasks before provisioning the desired device, please see the following articles:
Provision the Phone Template
- Log into the bvoip phone system.
- Click on the Extensions drop-down menu.
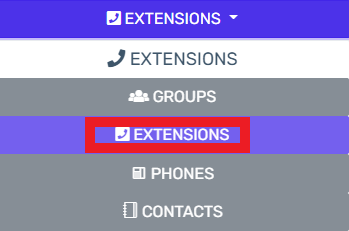
- Go to the Extensions subsection.
- Select the Edit button next to the extension that the device is being applied to. Click the Add button to create an extension that the device will be applied to.
- Navigate to the Phone Provisioning tab.

- Click on the Add New Phone Device button. A pop-up will appear.

- Select the desired device model in the Templates drop-down.
Note: Make sure to use a template ending with the -bvoip after the needed phone model.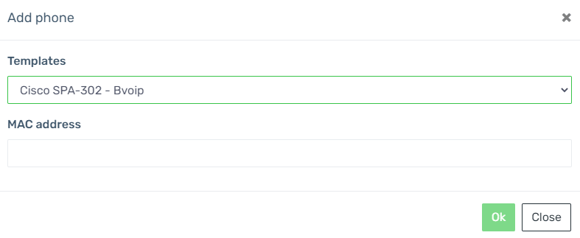
- Add the MAC address without colon into the MAC Address field.
- Select the Save button. The pop-up for the provisioning will close and the page will refresh with new sections being shown.
- Click the Save button to save the phone template to the extension.
Once the phone template has been saved, it is time to manually provision the phone.
Locating the MAC Address
The MAC address for the device can be found in the phone admin system by:
- Click on the Admin Login page.
- Click on the Voice tab.
- Click on the Info tab
- Scroll down to the Product Information section.
Manually Provisioning the CISCO SPA Phone
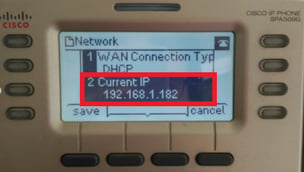
- Press the dog-eared page button.
- Scroll down to the Network option.
- Press the Select button.
- Point 2 will show you the IP of the phone. This is the IP needed to access the phone admin screen. You won’t be required to create a password.
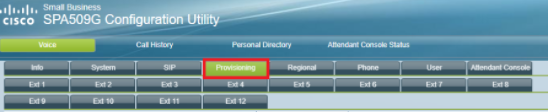
- Click on the Admin Login link.

- Click on the Advanced link.

- Click on the Provisioning tab.
- Scroll down to the Profile Rule field.
- In the Profile Rule field, ensure that the provisioning link is added from the phone provisioning section of the bvoip portal for the desired extension.

- Click on the Submit All Changes button.
- Press the dog-eared page button on the phone.
- Scroll down to the Reboot option.
- Press the Select button.
It will take several minutes for the factory reset process to be completed. The phone should reboot once for firmware to update and a second time to fully reboot.
Phone Still Not Provisioned?
If the phone has not provisioned with either sets of instructions, please refer to our Phone Provisioning Troubleshoot Guide.