
This article will provide a walkthrough on creating and managing a meeting in the bvoip Webclient.
Call Use Notice
Using this feature will apply to your simultaneous call count. If you would like this to not count towards your simultaneous call count, consider using Microsoft Teams' bridge functionality as an alternative.
Active Caller Conferencing Notice
If you're looking to conference a call with an active caller already, see Conferencing Webclient Calls.
Setting up the Dial-In Capabilities
Pick from one (or more) of the following options below which will allow external callers to reach the conferencing bridge.
Conference Settings
By default, the conference extension is going to be 70, 700, 7000, or 70000 depending on how many digits your phone system extensions are using.
You can follow our guide below for more information on changing this and other items like including your DIDs in the conferencing emails or updating the hold music.
Setting up a Meeting in the Webclient
Once you have a method for callers to reach the bridge, you can perform the steps below to setup a conference call.
- Log into the bvoip Webclient.
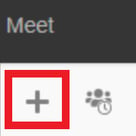
- Click on the Meet submenu option.

- Click on the plus sign to create a new conference.
- For the Type option, select the desired type of meeting.
- For the When option, select either Now or Later. Selecting Later will have the time, date, and meeting length options appear.
- In the Subject text field, add the subject of the Meeting.
- In the Notes to Participants text field, input any related meeting notes.
- Click on the box to Enable Announcements, if desired.
- For the Select Email / Calendar to add to drop-down, select the desired medium to invite other users to the meeting.
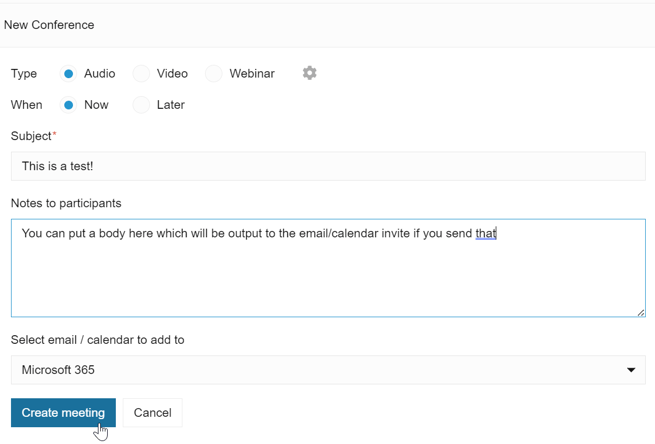
- Click the Create meeting button and you'll be brought to the meeting info screen. You can call in to the conference IVR or DID if configured, or extension (See settings above) and you should be prompted to enter the conference ID shown followed by the pound key (#). Once entered you'll be let in to the wait music until another attendee joins.
Don't Want an Email Sent?
If you don't want to create a new tab with a pre-formatted email to be sent, simply set the last dropdown to Desktop Outlook (.ics) and it will download an ICS file which you can just delete.
Need to See Meeting Statuses?
You can view the current state of meetings and future meetings, as well as drop or redial callers, via the Meet > + menu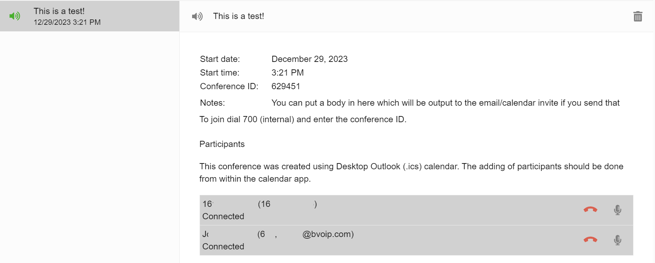
Transferring Callers to Conference
You can transfer a caller to the Conference extension, either to a personal conference or an existing conference ID
- Transfer to 700**<EXT> to transfer to a conference someone has active under their extension
- To reach this if you accidentally strand a caller in a non-existent conference, the extension you transferred to must open the Meet > + menu and add themselves to the conference that's listed
- Transfer to 700*<Conference ID> to send a caller to an existing conference ID that has already been setup
Making a Video Meeting
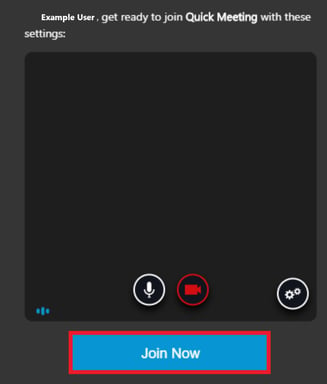
- Log into the bvoip Softphone.

- Select the Meet submenu option. The video option is readily available.
- Click the Join Now button. Once the new screen appears, a Meeting Link will appear to provide your participants.
Video Meeting Menu
All video meetings will have the following ten options in the meeting menu at the top of the screen.
- Video Toggle - This button will toggle video being on or off.
- Microphone Toggle - This button will toggle the microphone being on or off.
- Present - This button will allow for a user to share their screen.
- Chat - This button will open the meeting chat.
- Raise Your Hand - This button will alert the other meeting participants that the user would like to speak.
- Participants - This button will list the participants in the meeting and provide a participant count.
- Add Participants - This button will allow other participants to be added to the meeting.
- Start Recording - This button will toggle recordings.
- Options - This button will allow users to adjust their audio and video settings.
- End Meeting - This will let users leave or exit the meeting.
Repeat Meetings
If you would like the meeting that is created in the softphone to repeat, this can be arranged in the medium selected in the Select Email / Calendar drop-down.