
- Old KB
- Control Portal
- Webclient User Documentation
-
1Stream Platform
- Admin User Functions
- Application Download
- AutoTask Integration
- BrightGauge
- Call Routing Features
- Call Tools
- ConnectWise Integration
- CrewHu
- CRM Management
- DropBox Integration
- End User Management
- Enterprise Portal
- HubSpot Integration
- Freshdesk Integration
- General Troubleshooting
- Hudu
- InfusionSoft Integration
- Insightly
- Liongard Integration
- Kaseya BMS
- MSPbots Integration
- OneDrive Integration
- Power BI
- Progressive Dialer
- Reports
- Salesforce
- ServiceNow Integration
- Signal
- SyncroMSP
- ZenDesk Integration
- Halo Integration
- Transcription and Analytics
-
Control Portal
- Auto Attendant Functionality
- BLF Keys
- bvoip Fundamentals
- Call Flow
- Call Queue
- Call Recordings
- Call Rules
- Desktop Application User Documentation
- Dial Codes
- DIDs
- Extensions
- Extension Tools
- FAQs
- Google Integration
- Microsoft 365
- Multifactor Authentication
- Phone Hours
- Settings
- Security
- Shop
- SIP Trunks
- SIPTrunk.com Partnership
- Storage
- System Notifications
- System Tools
- Troubleshooting Guides
- Users
- Webclient User Documentation
- Whitelabelling
- Zoho Integration
- WhatsApp Integration
-
Device Management & Provisioning
-
Nucleus for Microsoft Teams
-
1Stream Client
-
Messaging
Adjusting Webclient Settings
This article will provide a walkthrough on how to adjust the settings in the bvoip Webclient.
Accessing the Settings
- Log into the bvoip Softphone.

- Click on the three horizontal dots. A pop-up menu will appear.
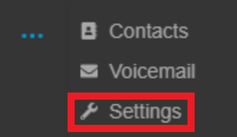
- Select the Settings option. A new screen will appear with a drop-down in the upper right corner. General will be the default.

The Setting Sections
There are nine setting subsections that can be reached through the drop-down menu.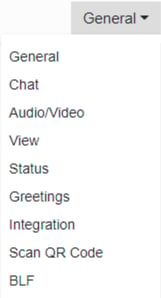
- General - This section will allow for extension users to adjust their photo, mobile number, language preference, theme, password and resend their credentials.
- Chat - This section will allow for extension users to adjust their chat notification settings.
- Audio/Video - This section will allow for extension users to adjust the device, ringer, camera, speaker and microphone settings in addition to arranging if they desire to use a headset or not.
- View - This section will allow extension users to add and remove people, Local PBX groups, call, queues, and wallboard options from their view.
- Status - This section will allow extension users to adjust existing statuses, call forwarding rules, customer statuses, mobile phone ringing, push notifications, multiple call options. There is also an option to make call flow exception rules with caller IDs, time frames and forward rules.
- Greetings - This section will allow extension users to record and adjust their greeting based on their call status.
- Integration - This section will allow extension users to adjust the way that a Contact URL is opened for CRM Integrations.
- Scan QR Code - This section will provide the QR Code for extension users to scan in order provision this extension for the mobile application.
- BLF - This section will provide the option for extension users to set their own line and BLF keys.