
- Old KB
- Control Portal
- SIPTrunk.com Partnership
-
1Stream Platform
- Admin User Functions
- Application Download
- AutoTask Integration
- BrightGauge
- Call Routing Features
- Call Tools
- ConnectWise Integration
- CrewHu
- CRM Management
- DropBox Integration
- End User Management
- Enterprise Portal
- HubSpot Integration
- Freshdesk Integration
- General Troubleshooting
- Hudu
- InfusionSoft Integration
- Insightly
- Liongard Integration
- Kaseya BMS
- MSPbots Integration
- OneDrive Integration
- Power BI
- Progressive Dialer
- Reports
- Salesforce
- ServiceNow Integration
- Signal
- SyncroMSP
- ZenDesk Integration
- Halo Integration
- Transcription and Analytics
-
Control Portal
- Auto Attendant Functionality
- BLF Keys
- bvoip Fundamentals
- Call Flow
- Call Queue
- Call Recordings
- Call Rules
- Desktop Application User Documentation
- Dial Codes
- DIDs
- Extensions
- Extension Tools
- FAQs
- Google Integration
- Microsoft 365
- Multifactor Authentication
- Phone Hours
- Settings
- Security
- Shop
- SIP Trunks
- SIPTrunk.com Partnership
- Storage
- System Notifications
- System Tools
- Troubleshooting Guides
- Users
- Webclient User Documentation
- Whitelabelling
- Zoho Integration
- WhatsApp Integration
-
Device Management & Provisioning
-
Nucleus for Microsoft Teams
-
1Stream Client
-
Messaging
Adding Funds for SIPTrunk.com Accounts
This article will provide a walkthrough on how to add funds to a SIPTrunk.com account.
Why Add Funds?
Adding funds to a SIPTrunk.com account's pre-paid balance is a great proactive way of ensuring that if any toll free and/or international traffic occurs, the account will remain active. Toll free and international traffic is billed as a per minute rate and funds are drawn automatically from the pre-paid balance.
Without any pre-paid funds available, this can cause a disruption of service as a SIPTrunk.com account will stop making and receiving calls once a negative balance is achieved.
Want to Get Billing Notifications?
For steps in setting up billing notification in the SIPTrunk.com portal, please refer to our Setting Billing Notifications on SIPTrunk.com Accounts article.
How to Add Funds
- Log into the SIPTrunk.com Portal.
- Go to the Payment Center menu option.

- Select Add Funds. The Add Funds to Your Account screen will appear.
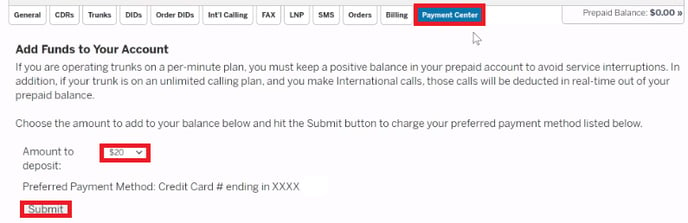
- In the Amount to Deposit drop-down, select the desired amount to be pre-paid.
- Click the Submit button.
Setting up Auto-Replenish Funds
- Log into the SIPTrunk.com Portal.
- Go to the Payment Center menu option.
- Select AutoReplenish. The Automatic Account Replenishment screen will appear.
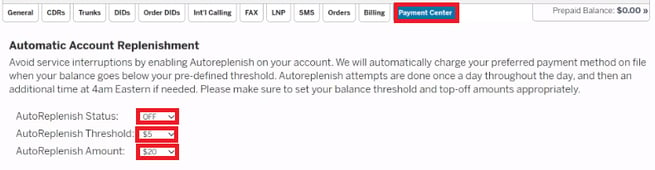
- In the AutoReplenish Status drop-down, adjust the setting to Yes.
- In the AutoReplenish Threshold drop-down, adjust the fund limit on your account to trigger funds to be re-added.
- In the AutoReplenish Amount drop-down, adjust the desired amount that should be added to the account when the threshold is reached.