
This article will cover the Saleforce 1Stream CRM Integration
1Stream Level Feature Notice
This feature is available for only View level 1Stream users and up. If you would like this feature to be available, then please reach out to your bvoip Sales Representative to upgrade user licensing.
Integration Note
The Salesforce User must have Admin permissions to be able to complete the Integration setup.
Salesforce Setup
- Login as an Admin User to Salesforce.
- Get The Username and Password of a Salesforce User with Admin permissions. These will be entered into 1stream’s CRM Settings.
- Select use an Existing User or create a New User.
- Security Token for that user. The Security Token may be required if IP Range Restrictions are not in place for the Salesforce instance. If there is no security token for the user, this can be reset. (Note: This will break existing Connected App integrations that use this user’s credentials.)
- Login as that User in Salesforce.
- Click View Profile icon on the Top Menu.
- Click the Settings link.
- Reset My Security Token menu item on the Side Menu.
- Click the Reset Security Code Button.

- Create a Connected App within Salesforce.
- Click Salesforce Setup icon on the Top Menu.
- Click Platform Tools.
- Click App Manager.
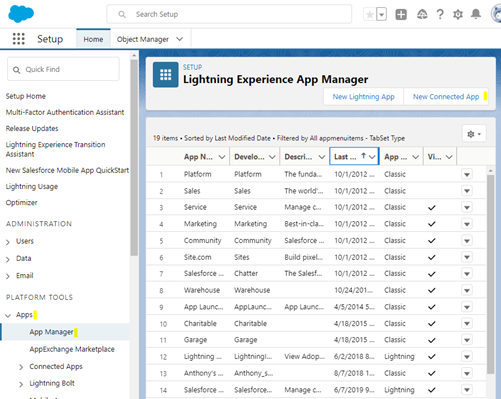
- Click Create New Connected App Button. This will open the below window.
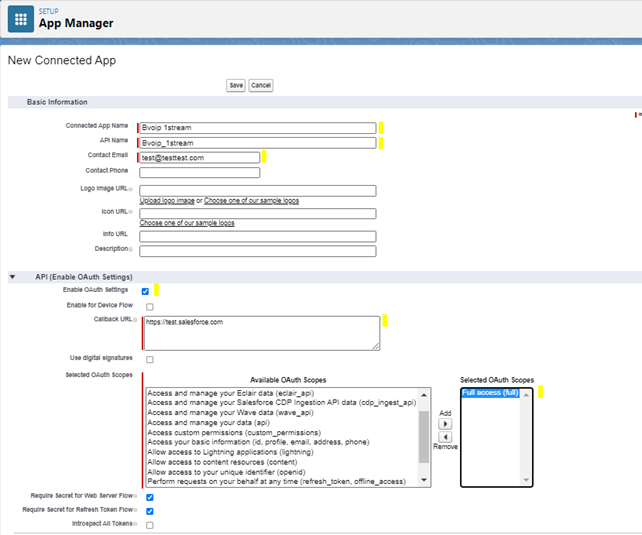
- Fill in the Required fields:
- Connected App Name. Select an App Name similar to bvoip 1stream for easy recognition.
- API Name.
- Contact Email.
- Click the Enable OAuth Settings Checkbox.
- Provide the required Callback URL. This value is not used by 1Stream, but a valid https value is required, such as https://test.salesforce.com.
- Select OAuth Scopes from Available OAuth Scopes List and Add Full Access to Selected OAuth Scopes.
- Click the Save button.
- Once the Connected App has been provisioned, copy the Consumer Key and Consumer Secret values for later use.
- Go to App Manager.
- Find the newly created App.
- Click View Option/Link.
- Click Manage the Connected App.
- Click Manage Button Edit Policies button at the top of the Manage Screen.
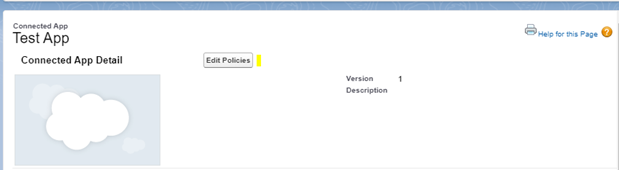
- Under the OAuth Policies section, make the selections below:
-
- For Permitted Users select that All Users May Self-Authorize.
- IP Relaxation select Relax IP Restrictions.
1Stream Setup
- Log into the 1Stream Portal.
- Go to the Administration menu.

- Choose the Manage Organization option. The page will refresh.
- Scroll down to the Connected Account and CRM Settings section.
- Click the green circled + button. The Add New CRM Platform pop-up will appear.
- In the CRM Platform drop-down, select SalesForce.
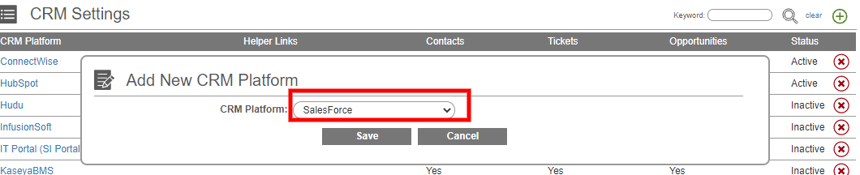
- Click the Save button. The pop-up will refresh to the Modify Salesforce Connection Settings window.

- From the Modify SalesForce Connection Settings screen, fill out the following.
-
- API Key: This is the Connected App’s Consumer Key from above.
- API Private Key: This is the Connected App’s Consumer Secret from above.
- CRM Username: The Salesforce User’s UserName
- CRM Password: The Salesforce User’s Password
- Integration Code: The Salesforce User’s Security Token, if needed. If IP Range Restrictions are not in place for your Salesforce instance, this will be required. (Please Note: If it is provided and IP Range Restrictions are in place, it will be evaluated. Depending on how your Salesforce instance is setup, this can cause issues.)
- Endpoint: Your Salesforce instance endpoint. Usually in the form of https://na00.salesforce.com/ or https://something.my.salesforce.com/
- CRM Details Link: Same as the Endpoint value